I have been an internet user for more than 2 decades. I have used dial-up connections in the past when internet speeds were not that great in our country. Then, I used multiple tricks, settings, and all to increase my internet speed a bit for speeding up my browsing. Some of those tricks worked, and some of those didn’t.
Out of all those experiences, I have jotted down a few of them which did work for me in the past, and it still does help if you are still using a slow connection. Thus, I wrote this article titled “How to Increase Internet Speed on Windows 10” for all of you who need tricks to speed up your connection. These tips should work on Windows 11 as well.
There is nothing worse than working on a slow internet connection because it wastes a lot of time and also your productivity gets compromised. There are different reasons for slow internet. In most cases, your ISP is the culprit. But, sometimes the slow connection can be due to your Windows OS or some computer-related problems as well.
I have been listening from a few of my friends and colleagues that their internet speed is a bit slower after they installed Windows 10 on their PC. At first glance, you will think about how it is possible that upgrading to the latest version of OS can cause slow internet. But, this can be possible because of multiple reasons. The main reasons are heavy bandwidth uses of the OS, and many background services running in the background.
Below are the tips and tricks I am going to share for increasing the internet speed on your Windows 10 computer, but I would recommend you to use any internet speed checker website to record the speed before and after applying the tricks so that you may come to know how much impact is there.
Best Tips and Tricks to increase internet speed in Windows 10
-
Enable the Limit Reservable Bandwidth and Set % to 0
By default, Windows 10 uses 80% of bandwidth and leaves only 20% for use which slows down internet browsing. But, the good news is you can override this by enabling the Limit Reservable Bandwidth and setting that to 0.
Below are the steps to do it:
- Press the Windows button + R to open Run, and type in gpedit.msc which will open Group Policy editor.
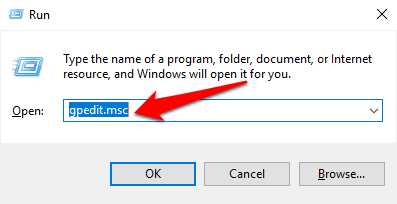
However, Gpedit.msc comes with only some Windows package, and many don’t have it such as Windows 10 home doesn’t have it. So, if gpedit.msc run command doesn’t work for you, click here to know how to enable it. Once gpedit.msc is accessible, then move to the next step.
- Navigate to Computer Configuration >> Administrative Templates >> Network >> QoS Packet Scheduler. And, then double-click on Limit reservable bandwidth

- It will open a pop-up window for limiting the reservable bandwidth. Select Enabled. Set the bandwidth limit to 0, and click OK.

That’s it. Now, the reservable bandwidth is free for general use. It boosts internet speed to a good extent.
-
Turn off Background Apps
In Windows 10 there are many apps that keep on running in the background, and they share your internet bandwidth as well. That slows down your internet connection a bit. So, the solution is to turn off those background apps and save the bandwidth to get a faster internet connection.
To do this, go to Setting.

Now click on Privacy.
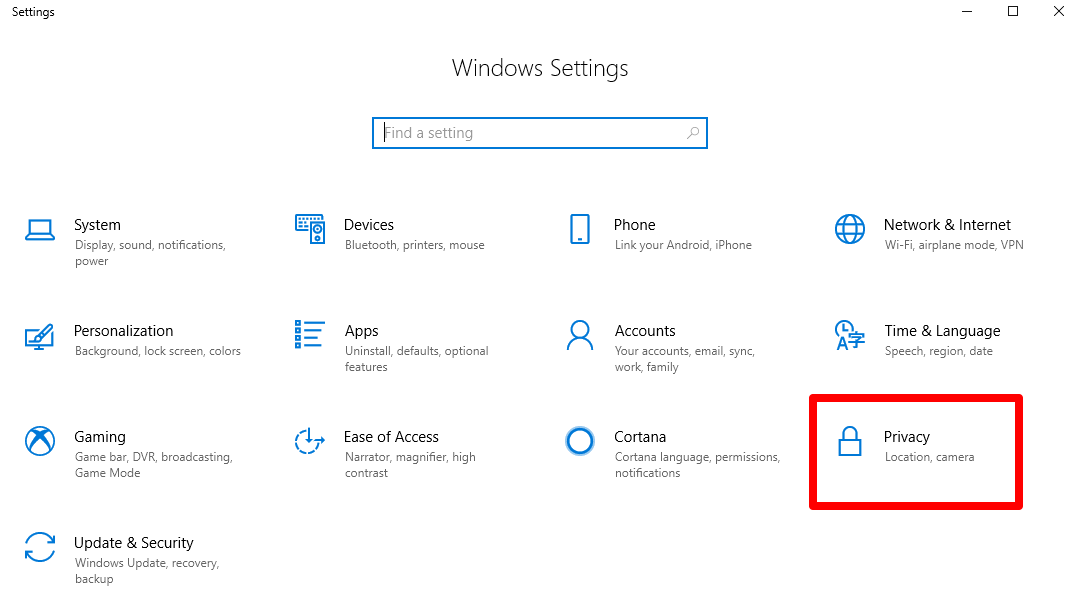
Now, click “background apps” from the left pane. And turn it off.

This will help to save some of your internet bandwidth and improve the internet browsing.
-
Change to Google Public DNS
This may or may not increase your internet speed because it all depends on the DNS server you are using. If you are using the DNS server which location is quite near to your location, changing it may not help but if your DNS server is situated far away from your location, changing to Google Public DNS would help because it is one of the fastest public DNS which has servers around the world that keep responding to the requests.
Your nearest Google’s DNS server will fulfill your requests which results in faster connection because the nearer the server the faster your connection will be.
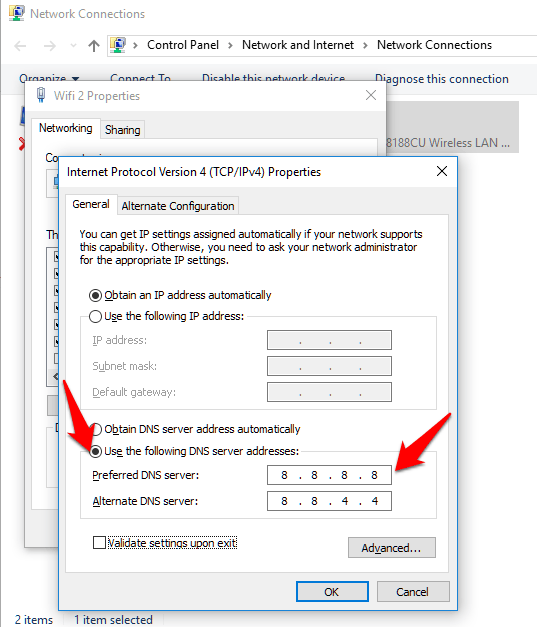
I am not writing the full guide about changing the DNS on your PC because I have already written a blog post about it which you can read by clicking here.
-
Disable Windows Updater
Windows update service is not advisable to be disabled since it keeps updating your Windows installation with new updates, but if you are really pissed off your internet connection’s speed, you can disable it to save some more bandwidth that would increase the internet speed.
For this, you have to go to Services which you can type in the taskbar search and click it.
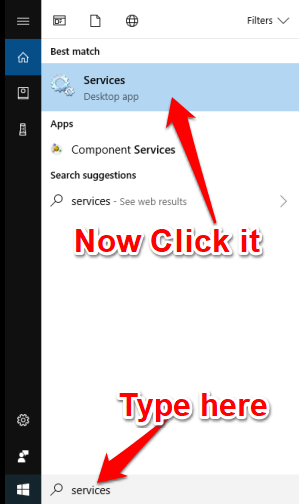
Find Windows Update from the list. Click “Stop”. This will stop this service. Now, double-click “Windows update” to open its properties.
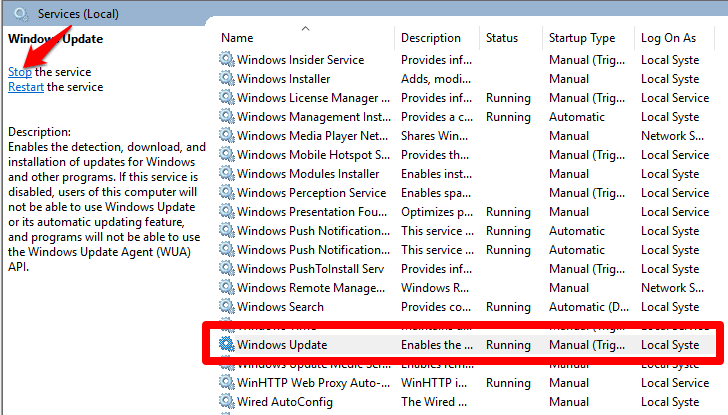
Now its properties window will open.
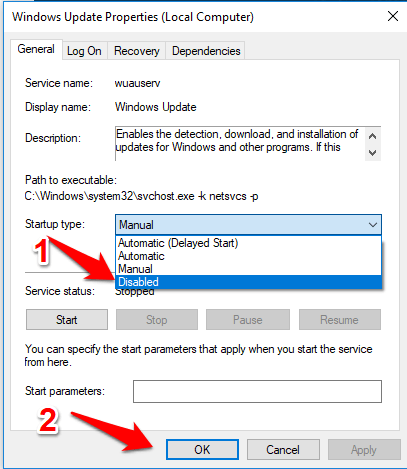
In the Startup type, select Disabled, and click OK.
Restart the PC now.
Also, you should know how to change the bandwidth limit in Windows 10 because limiting the bandwidth(We did talk a bit about bandwidth earlier in this post), you decide how much bandwidth you want to keep for downloading and uploading update data from Microsoft servers as well as for other updates on your PC. Because at times, most of your internet bandwidth goes in downloading various updates on your PC, and you face a slow connection. So, limiting the bandwidth would be helpful. For this, you have to follow this:
Go to Setting >> Update & Security >> Advanced Options >> Click Advanced Options link >> Now, click Delivery optimization, and again click Advanced Options there >> Now, Under “Download settings,” check the Limit how much bandwidth is used for downloading updates in the background option, then move the slider to change it.
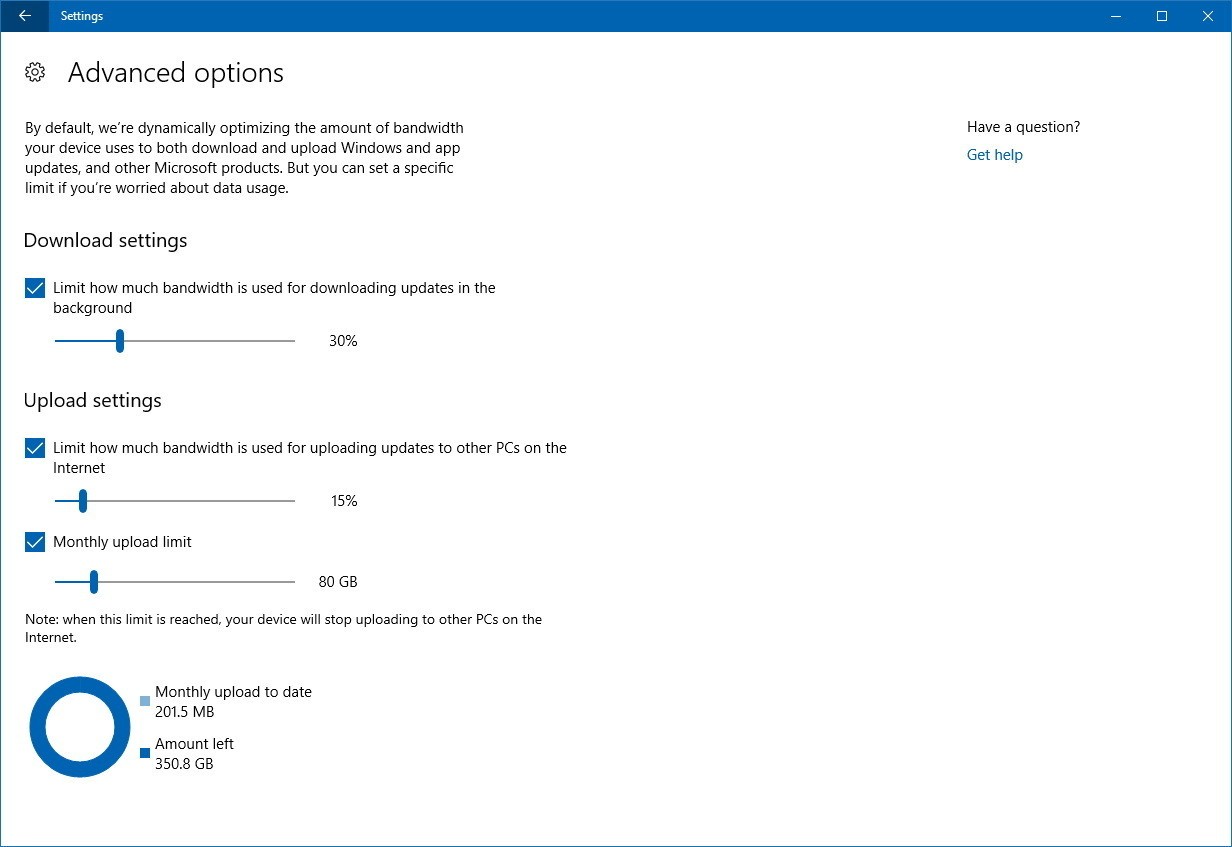
Then Also, under “Upload settings” do the same, and move the slider to change.
This is how to change the bandwidth limit in Windows 10.
-
Clear Windows Temporary files and Caches
This works for all versions of Windows. Just go to Setting >> System >> Storage >> Change how we free up space.
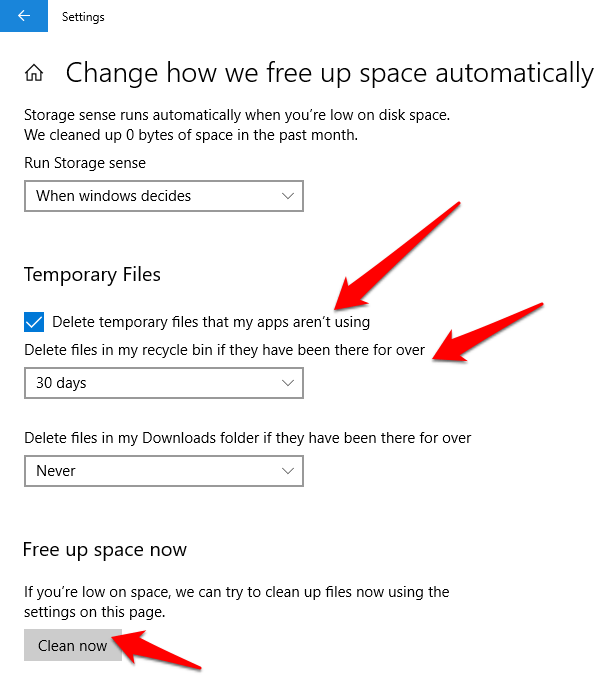
Click Clean Now.
Alternatively, you can also try run commands: temp, %temp% one by one by typing in the RUN, and hitting enter. Delete the contents that show when you hit enter for both.
-
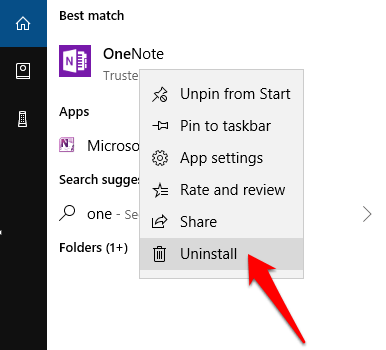
Uninstall OneNote App
Windows 10 comes with OneNote app which may or may not be useful for you. If it is useful for you, skip this point. If you are not using it, uninstall this since it uses some of your PC’s internet bandwidth while syncing files and folders.
For uninstallation, type Onenote in the search box of the Taskbar. This will appear there under best match. Now, right-click on it and click Uninstall.
-
Flush DNS
The PC keeps a list of the sites and their IP addresses which we open frequently. These records are maintained in the DNS Resolver Cache. Data becomes obsolete after a long period (few months). So, we can flush the DNS resolver cache to flush out those obsolete data. This can make your connection slow for a while because your PC needs to DNS lookup for every new site. But, very soon you will experience a faster internet connection than what you were experiencing before DNS flushing.
To do this, go to Run, type in cmd, and hit enter. Command Prompt will open.
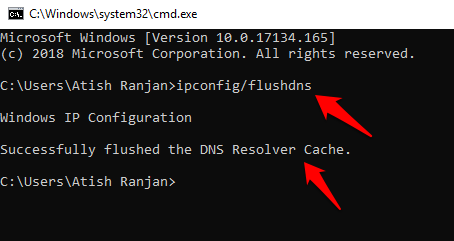
Now, in the Command Prompt, type ipconfig/flushdns, and hit enter. This will flush the DNS, and you will soon experience faster internet connection.
How to Increase Internet Speed Using CMD in Windows 10?
- Flush DNS: About this, we have already discussed just above.
- Renew IP Address: Problems maybe because of IP conflict or some problem at DHCP Server which could be fixed by a simple IP reset. To do this:
Open RUN, type CMD, and hit enter to open the command prompt. Now type the command ipconfig /release and hit Enter. You will see a lot of texts there.
Now, type ipconfig /renew and hit Enter. This would reset your computer’s IP address which may solve a slow internet issue.
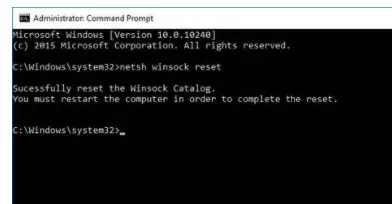
- Reset Winsock: Windows OS uses multiple sockets to exchange information. If there is any problem or corruption in any socket, it can be the cause of slow connection as well. So, to fix this, Resetting Winsock is the way to go as it resets the sockets to default settings. To do this, just go to Command Prompt, and type netsh winsock reset, and after this command is excuted, restart your computer.
That’s it.
I know these three methods that can help increase internet connection using CMD. But, there would be many more such tricks. Please share in the comments if you know any other tricks.
These are a few ways to increase internet speed on Windows 10. Moreover, there are a few more things you can do such as:
Switch off and on your Wifi Router: Sometimes, just switching off the router, and after 10-20 seconds, restarting again helps you increase the speed to a bit.
Disable/Enable the Network Connection: If you are connected through Ethernet cable, then go to Control Panel >> Network and Internet >> Network and Sharing Center. There in the left pane, click Change adapter settings. There you will see the Network Connections. See the one that is connected. Right-click on that and click Disable. Then again, right-click on that and then click Enable.
At times, this helps to improve the internet speed a bit.
How to Boost Upload Speed on Windows 10?
We always talk about how to improve the download speed of Windows 10 but we hardly talk about boosting the upload speed. Upload speed is equally important for those who usually upload a lot.
Here are a few quick tricks that help boost upload speed on Windows 10:
- Try using a wired connection: A wired connection offers much faster upload speed than wireless. So, if you can, try using the wired connection. I have been using Airtel Fibernet for more than 3 years now, and it has been offering me awesome upload and download speeds. I have used a few other broadband services as well; they used to offer good download speed, but the upload speed was not that great.
- Clear your temporary files: Clearing temporary files on your PC is required to smooth the function of your computer and the internet as well.
- Change your DNS settings: You can change the DNS setting, and update the DNS to Google Public DNS or OpenDNS for better upload speed which I have already mentioned in this article in detail.
- Update device drivers: Make sure to keep your PC drivers up to date. outdated drivers can cause slow upload speed.
- Remove malware: Keep scanning your computer for malware from time to time as it hinders the internet connection speed both upload and download. So, try checking for this, and if you find any, remove them.
- Turn off the internet of other devices: When you have to upload some files, try turning off the internet of other devices that are connected to the same connection. Or, just remove them. It will surely help.
Conclusion
If the internet is slow from the ISP’s end, we cannot do much but if there is no problem at their end, and speed is coming fine. And, If you are still facing a slow connection, then you can try these tips and tricks mentioned above to boost internet speed on Windows 10.
Share your thoughts and views in the comments. If you have any questions, do ask in the comments as well, I will try my best to respond with some solution.
Thanks for reading.


Hi
Atish,
You have provided great tips to speed up internet speed on Windows 10. I have also heard from few of my friends that their internet speed has decreased after installing Windows 10. The step by step guide from your side to increase interet speed on Windows 10 is awesome and I am sure it will help the users.
Thanks for sharing.
Best wishes,
Praveen Verma
Hey, Great post! I am already benefitting from your tips. However, can you suggest some more apps that slow down the internet, and I can uninstall them if I do not need them?
great to know that Internet speed increases can be done by these steps and changing settings in the pc. I would like to know the best-speed range of internet suitable for windows 10. My internet speed on ookla showing: download speed of 19 Mbps. Internet is slow sometimes. would these tips help to run the internet smoothly?
Hi, Atish!
Thanks for the tips for speeding up the internet under Windows 10. They are very helpful. One thing I always do is power cycle my computer, router, and modem at least once a week, in case a driver gets in a funky state. Mind you, this is not a reset or restart, which doesn’t remove power from chips, this is a power cycle so that the chips forget (mostly) the last state they were in.
Slow internet speed is one the issue windows 10 users often face. All the tips you have mentioned are absolutely true to boost internet speed. I would like to add one more point to your list i.e. remove malware & virus from your PC by regularly scanning with Anti Virus..
Virus can slow down the Computers performance and ofcourse hinder the internet speed