Most of the corporates around the globe use a DHCP network. This would be helpful in assigning an IP address to your computer automatically. But, in case the DHCP is disabled on your computer, it may have problems connecting to the internet in some instances.
How to enable DHCP in Windows 10? We will try finding out the steps and have a tutorial on how to enable DHCP in Windows 10 computer.
What is DHCP?
Before we can move ahead and understand how to enable DHCP in Windows 10, it may be worthwhile to find what exactly is DHCP and how it affects your configuration in a corporate network.
DHCP stands for Dynamic Host Configuration Protocol. It is a network configuration protocol used in the case of TCP/IP networks. The DHCP server will assign IP addresses to each of the computers on the network and thus configures it to communicate with the other computers over the network. DHCP also configures a few other network management settings on the target computer.
Why should you enable a DHCP server on Windows 10 computer? Well, enabling DHCP on Windows 10 helps you avoid configuration errors. This is done by assigning unique IP addresses to each of the computers within the network and then sharing this IP address with the other computers over the IP network.
How to Enable DHCP in Windows 10?
Your computer needs an IP address to communicate over the internet. The IP addresses can be of two types – static and dynamic. The static IP address, as the name itself should be indicative of, is fixed for a particular computer and does not change between different internet sessions. A dynamic IP address does change for every internet session.
Ideally, the IP address of your computer would be static, and the dynamic IP address is disabled by default.
However, if your ISP – Internet Service provider supports dynamic IP address, you can enable DHCP server on your Windows 10 device (or for that matter a computer with any version) to make use of the dynamic IP address for better connectivity. Enabling DHCP on Windows 10 will make your computer obtain a dynamic IP address automatically.
Here are the steps you can use to know how to enable DHCP in Windows 10:
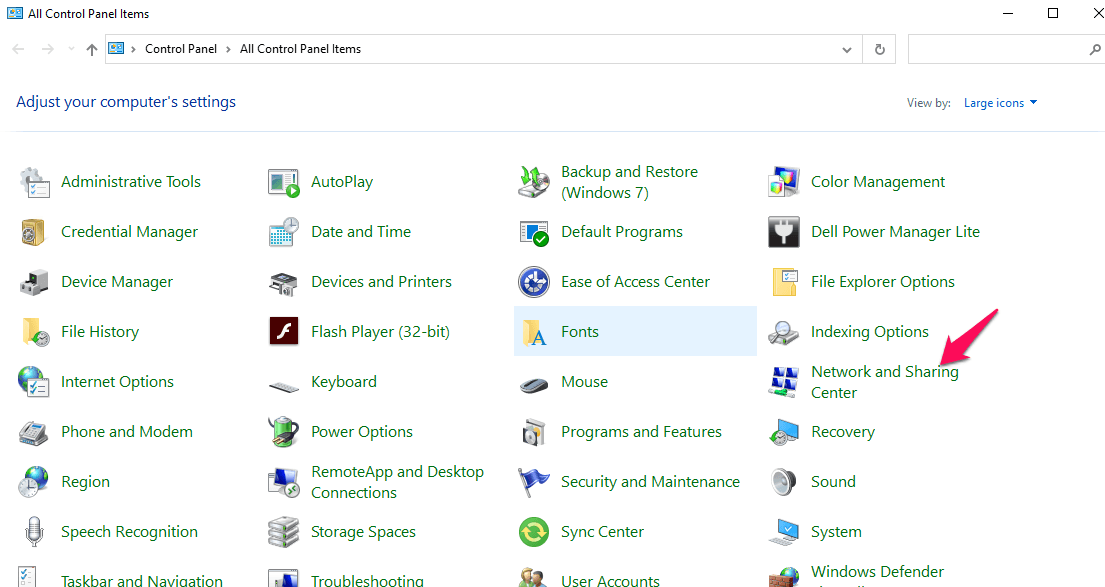
- Go to Control Panel and choose Network and Sharing Centre
- Choose the network you are connected to and click on it. This should take you to the status of your network connection.
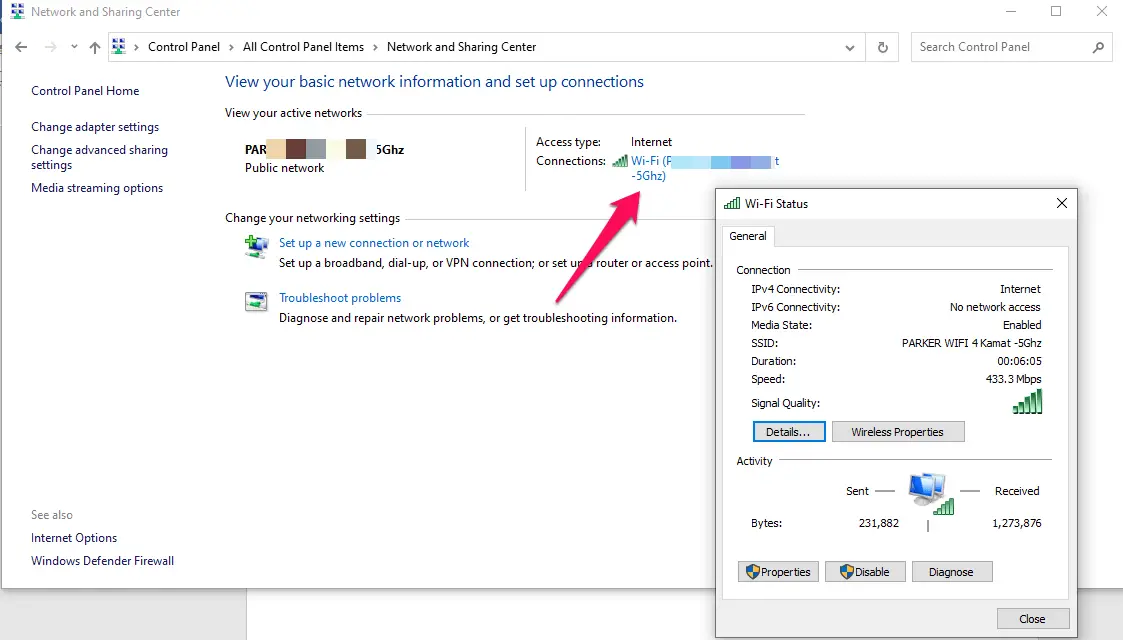
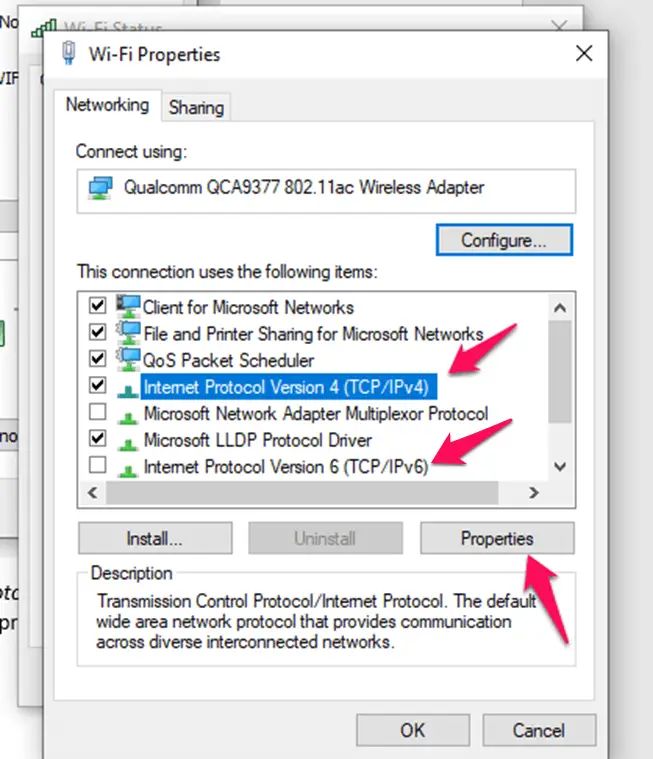
- Click on Properties on the WiFi Status dialog box. This will take you to the further settings of your WiFi connection.

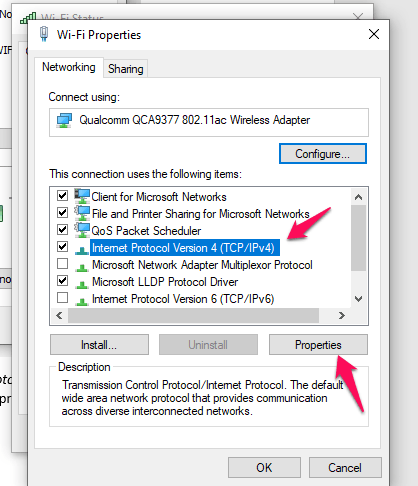
- Under the Properties dialog box, click on Internet Protocol Version 4 (TCP / IPv4) option and select Properties. This will take you to the TCP/IPV 4 properties window.
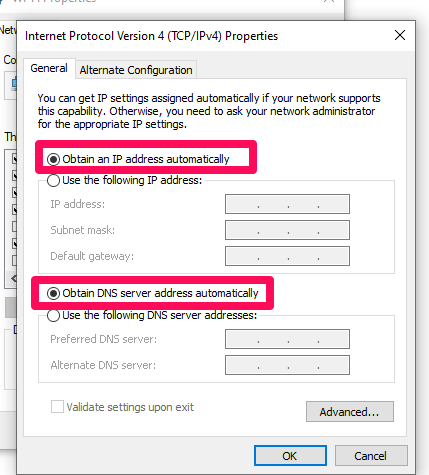
- Choose the options to obtain an IP address automatically option and the obtain DNS server address automatically and click on OK.
That should do it and let you know how to enable DHCP in Windows 10. Your computer is now configured to receive the dynamic IP addresses. If your ISP takes up dynamic IP address into charge, your computer will take advantage of it and connect you through the dynamic IP address.
If you are using IPV 6 or Internet Protocol Version 6, you will need to repeat the above steps for IPV 6 on the WiFi Status window.
The DHCP server keeps a record of all available IP addresses, and when an internet connection is sought, it assigns one of the IP addresses currently available by selecting the one from the IP address pool. The IP address assignment has a time frame after the lapse of which the device needs to send another request to initiate the internet connection. The time out period usually lasts 24 hours. Thus your device will receive different IP addresses for different internet sessions.
How to Disable DHCP on Windows 10?
There may be cases where you do not want to use a dynamic IP address and switch to a static IP address. In such cases, you would need to enter the static IP address yourself. The steps would remain similar except for the last one wherein you need to enter the static IP address values.
Follow all the steps above until the last and make the correct settings.
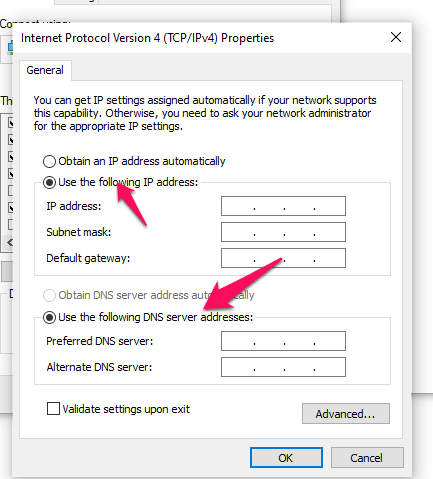
Choose the option for Use the Following IP address and use the following DNS server addresses options and then enter the correct value for the IP address and DNS server addresses. Make sure that you know the correct addresses while making any changes. If you have configured wrong entries in the dialog box, you will end up being not connected to the network.
How can you tell if you are using DHCP?
Are you not sure whether you are using DHCP on Windows 10 or not? There is an option to check whether you are using DHCP server on your Windows 10 computer. The method will make use of the Command Prompt.
Follow the steps here to know whether you are using DHCP on Windows 10:
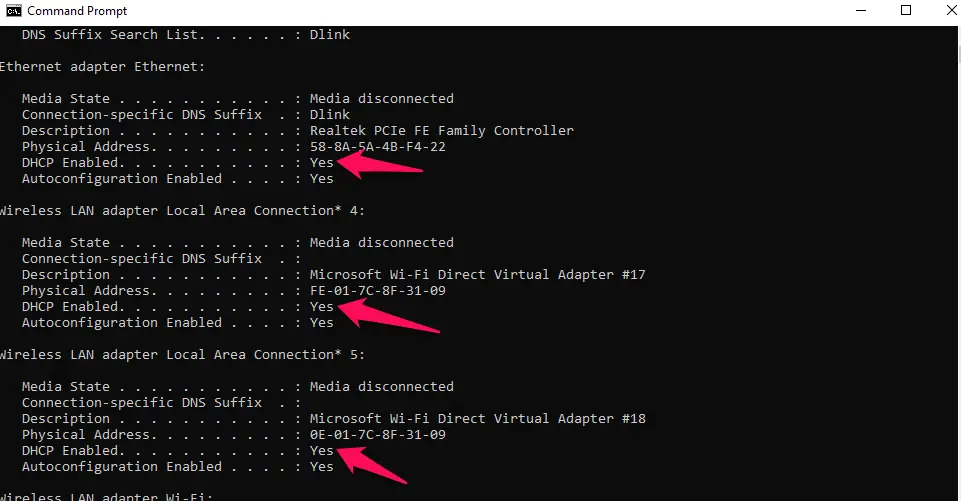
- Launch Command Prompt. You can do this by typing in CMD in Windows Search and picking the right option from the search results.
- Type in the following command and press ENTER
ipconfig / all
You should find all the network adapters available on your computer. Check the network you use and locate the line that says DHCP Enabled. If you are using DHCP on Windows 10 (or any operating system version), you should find the following line
DHCP Enabled. . . . . . . . . . . : Yes
The result will ideally be available on all the connections that include WiFi and Ethernet.
The Concluding Thoughts
Enabling DHCP on Windows 10 would be helpful in getting access to the best possible internet connection on your Windows 10 computer. If you are wondering how to enable DHCP in Windows 10, the steps explained above should provide you with complete information on how to enable it.


Hey Timmappa Kamat ,
Excellent and well-written post. I truly appreciate your hard-work.
Glad to say that you have done a fabulous work and suggested helpful tips to enable DHCP in window 10. You have explained the topic very nicely and provided all the necessary information that is well enough to understand & educate the readers.
Your each of the suggested steps (including images) are so clear and is providing better understanding as well. Following the steps will be a great helping hand.
Eventually thanks for sharing your knowledge and such a helpful post.