Google Docs is a cloud-based word processor tool, and very popular. It is a great replacement for Microsoft Word but it has some limitations as well. But, for almost all the users, Google docs is well enough to do their tasks.
There are many people who still prefer to work with MS Word. But, I am in love with Google Docs because I don’t need to send the files if I am working on two computer systems. I can access my Google doc files anywhere with an internet connection as it is a cloud-based application. I have been using it especially the document creation, and create sheets for calculations & lists.
Also Check: Best MS Word Tips and Tricks to Make Your Life Easier
Today, In this blog post, I am here to share a trick that can be useful for you and that is “How to put text over an image in Google Docs”. Generally, we do these types of stuff in some image editor tools or Photoshop. But, you can do the same in Google Docs as well. So, let’s see how we can put text over an image in Google Docs.
How to Put Text Over an Image in Google Docs?
Step 1: Open docs.google.com, and click on “Blank” to create a new blank document.

Step 2: Now, you will see a new document. In that, go to Insert >> Drawing >> +New
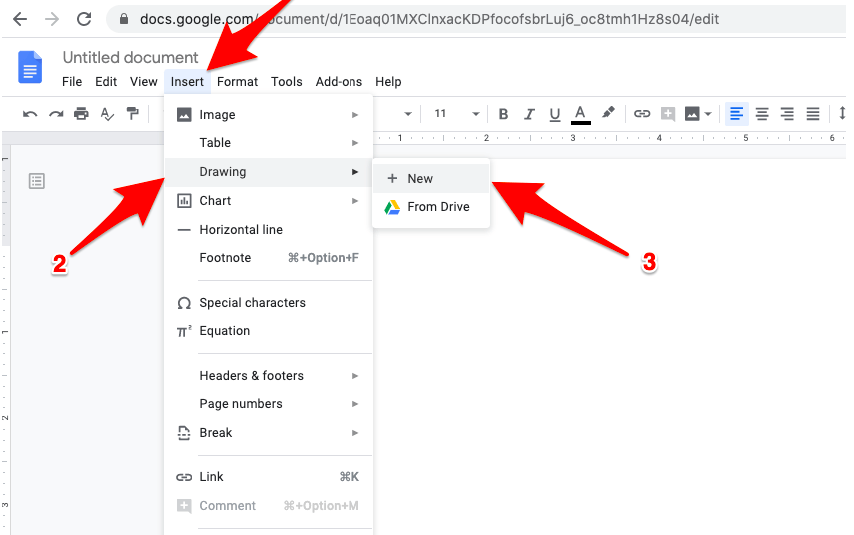
Step 3: You will see a pop-up box “Drawing” as you can see in the below screenshot.

There you will see an image icon. Click on that, and choose an image. Now the image will be imported in the drawing box.

Step 4: Now, Click on the Text option.

And, then click on the image to place the text area which will then look like this:

Step 5: Now, start typing in that area, and adjust the text as you want. You can do a lot of basic formatting for the text, and move wherever you want within the image.
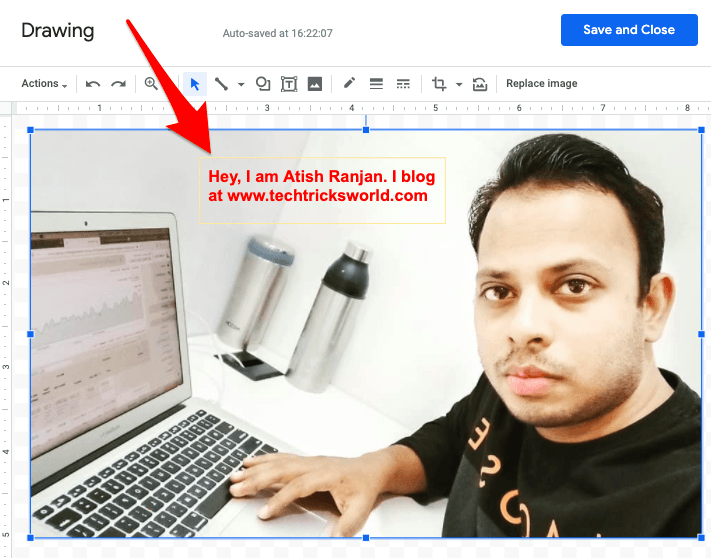
Step 6: Click “Save and Close”, to insert this drawing into the doc.
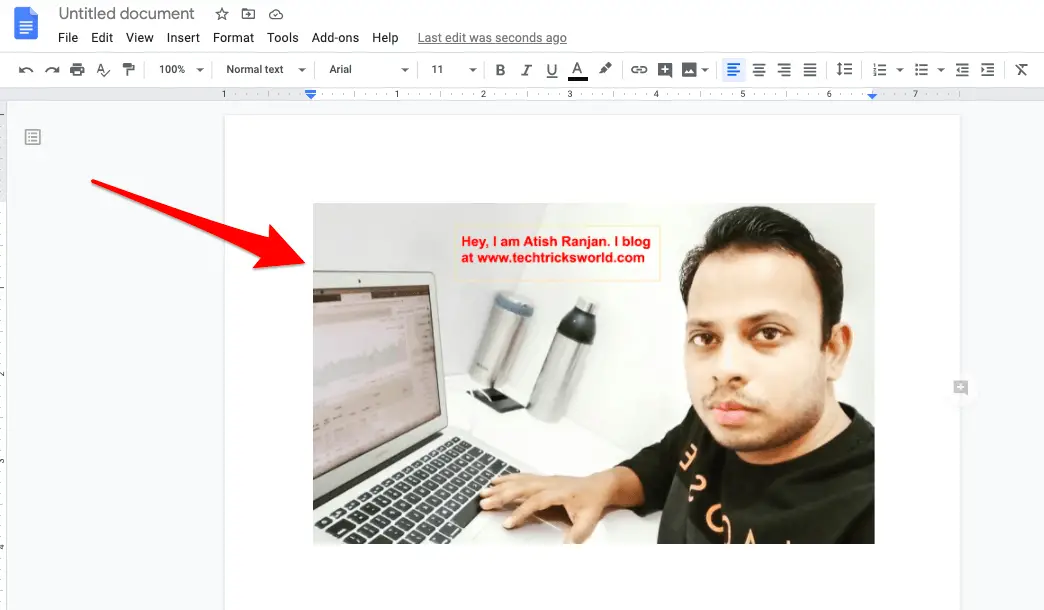
Now, if you want to change the text, you can just double click anywhere on this image(including text area), it will open the drawing pop-up, and you can make changes there, and then again save that.
So, this is how you can Put Text Over an Image in Google Docs.
Apart from the text, you can do a lot in the drawing section. You can add shapes over the image to even make something creative. There is a lot to do there. You can experiment with the drawing tool there.
So, now you know how to put text over an image in Google Docs. Now, let me tell you a few good reasons to love and use Google Docs.
Few Reasons to Love Google Docs, and use!
- Email and Download the Doc in various formats
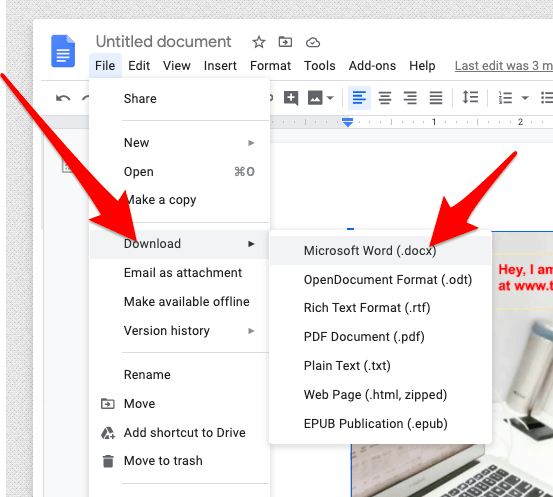
This is one of the best features of Google Doc through which you can just create a doc on Google Doc and download or email that in any of the formats such as HTML, Docx, odt, PDF, rtf, and many more. That means, even if you don’t have the tools to create such file formats, you can just create on Google doc, and download in that format.
For example, on my Mac, I don’t have MS Office installed, so, when I create a document using Google Docs, then if I need to send in Docx format, I just download in that format, and email that.
- Voice Typing
Voice Typing is another feature that I like. Using that, you don’t need to type, just speak, and that will be typed in the document. This is an amazing feature if you are not feeling like typing or you may have hurt your finger somewhere while doing something. So, in those cases, voice typing can be great. Just start speaking, and typing will be done. Or if you are someone who cannot type fast, then also voice typing would be helpful
- Online Collaboration
Multiple users can work on one Google Docs file, and the changes reflect and visible to each user in realtime. So, that is a great thing for me, and to many users. I like this feature of Google Docs.
Conclusion
I hope you now well aware of how to put text over an image in Google Docs document. This is very easy as I explained above.
Apart from this, I shared few Google Docs features that I love, and there are countless features that are there which can be useful for different users.
Share your views in the comments!


I watched your video and read the article. The method you showed me, how to text on a picture is very simple. I didn’t know there was such a way. I used MS Paint to write text on pictures. Here is another easy way for me to read your article. Thank you so much for letting us know about this method. From today I will use the method shown by you. Because I liked the method of Google Docs from MS Paint. Thank you again.
Hey Mate,
Glad you liked it. Thanks for coming by, reading and watching the video. Many thanks.