While any soft copy may be turned into a hard copy by printing that using a printer, similarly, a hard copy can be turned into a soft copy by scanning that using a Scanner. If you are using a Mac pc and looking for how to scan a document on Mac, read through the following lines to get your answer in detail. We have depicted each step with pictorial illustrations for your better comprehension. Further, some other insights may come in handy for you.
How to Scan a Document on Mac: Using A Scanner and Mac?
Having a scanner device with you may make the task easy as it may not need any third-party apps for the process. Before we can start, you may need to look at the scanner in document feeding type or a flatbed scanner. Here is the generalized process; check and be ready for minor changes for you to detect scanner settings:
Step 1: Connect the devices and turn them on.
Step 2: Go to the Apple menu, and then choose System Preferences.

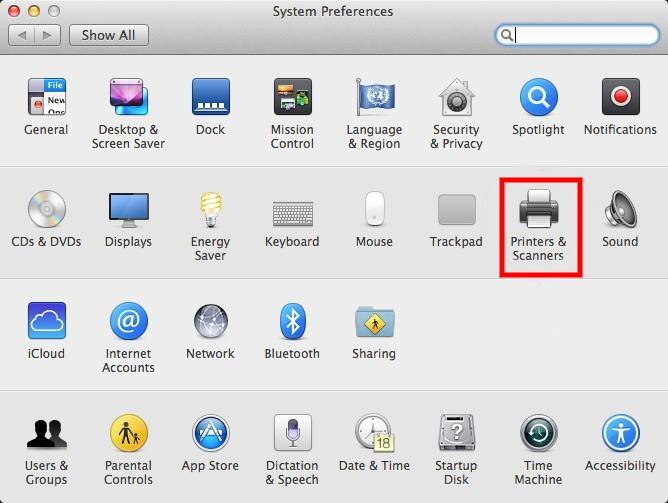
Step 3: Choose Printers and Scanners on the System preferences page

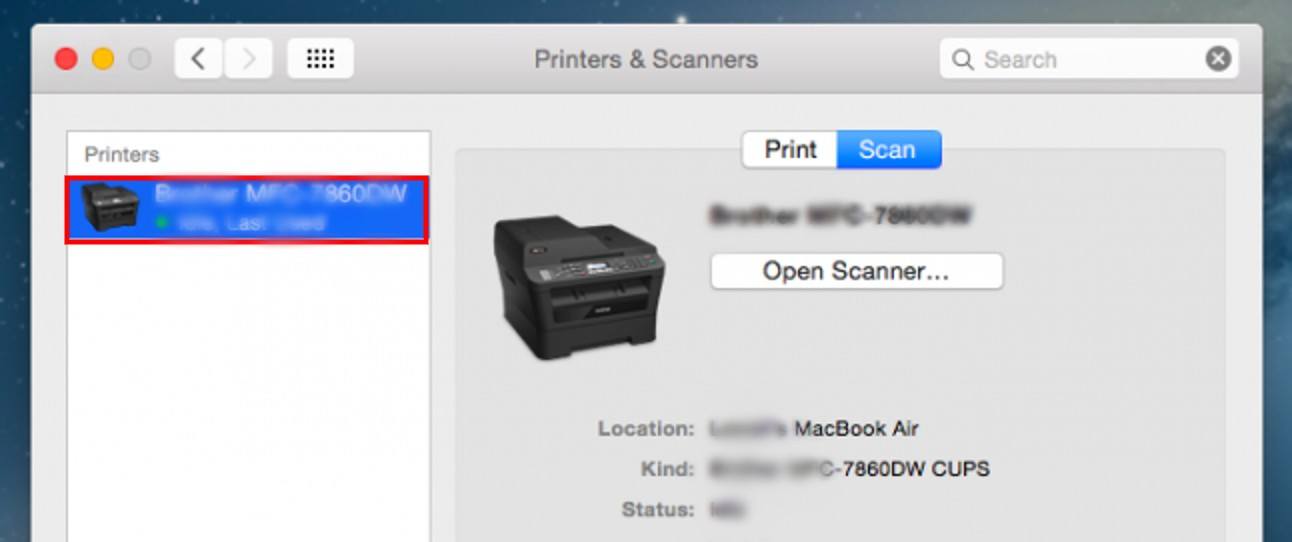
Step 4: Once the devices are all set, put the scanner in the document feeder. Choose your scanner from the list of options on the left side of the panel.

Step 5: Now, on the right side of the screen, choose Open Scanner.

Step 6: Choose document Feeder (or remove this option for flatbed scanner) and then set a few scanner options to start the scanning process. These may include the type of image, single or both sides, size, storage location, and color adjustments.

Step 7: Click on Scan, and the scanning process will start.

What Options Can You Adjust Before You Start Scanning?
While scanning a file without any preferences may give out a pale result. Later, you may need to make changes like edits and color filters. Thankfully, you can mitigate all this hectic procedure by ensuring some basic settings while you scan. Here are a few areas you take leverage to add preferences:
- Color-Kind: You can choose from either scanning it in black and white or a color copy of the document. The scanner often has the ability to calibrate these settings. Usually, for official purposes, people prefer the b & w version. While for scenarios like school projects of students, they may prefer the other option.
- Resolution: This attribute often determines the quality of the scanned copy later. Measured in DPI, each DPI may be perceived to be a pixel. Therefore if there are no size constraints, one may choose a higher DPI, ensuring better quality.
- Size: This preference usually points out the dimensions of the scanned product. For instance, the image may be stretched out in the hard copy; this can be resolved by changing the orientation and size of the scanned copy.
- Rotation: you can either scan the document as it is or may choose to rotate it in any other angle as preferred for submission and later uses.
- Scan to: This preference depicts the type of file to be saved after scanning. If you’re scanning a picture, you may choose to save it as an image. If you are scanning a document, you can save it as a PDF. Format settings may assist these preferences.
How to Scan a Document without a Scanner?
If you don’t want to scan regularly, you may not prefer to have a scanner device on your premises. There are alternatives that you may consider for scanning. You can use your phone to iPad as a scanner device.
You may need to download a scanning app freely available on the AppStore and click the image of the doc. This will save the scanned copy automatically. Later you can transfer this file to the Mac. Some eminent options for iOS users include Adobe Scan, Scanner Pro, Microsoft Lens, and Swift scan.
Concluding Thoughts
That’s it! You now know How to scan a document on Mac. The process is simple, and you can effortlessly do the same with a few steps depicted above. Check out the other insights and come up with the best fitting choice for you. If you have any queries, please write in the comment section, and I will get back to you with solution.


Add Comment