If you are here means, you have already installed WordPress on your hosting server. If you have not yet installed WordPress, below tutorials will help you to do so.
- Install WordPress using Cpanel?
- Install WordPress on Your Hosting Server Using FTP Client FileZilla?
If you are a passionate web developer or want to test anything before doing it on your live blog then the same can be tested by installing WordPress on your Local Machine Using WAMP or XAMPP.
Now you have your brand blog live and you are excited to publish the first ever blog post on your new blog. Correct?
Wait! You still have some steps to go!
After fresh WordPress installation, you will have to do some simple but essential basic settings in your WordPress dashboard to have a smooth start.
Simple but Essential basic setting after fresh WordPress Installation
-
Delete Dummy Post, Comment and Page
By default, WordPress gives dummy post, comment, and page. This post, comment, and page are just for example and have to be removed after fresh WordPress installation. This leads you to continue with your first grand article for your reader.
Steps to delete Dummy Post
- Login to dashboard and click on Post>>All Post
- Click on trash button to delete the dummy article as shown in below image.

Steps to delete Default Comment
- On dashboard, Go to Comment
- Click on trash button to delete the dummy comment as shown in below image.

Steps to delete Default Page
- On dashboard, go to Page>>All Page
- Click on trash button to delete the dummy page as shown in below image.

-
Edit Default Category for blog post
You would like to define a different category so that you can divide your post category-wise. On fresh WordPress installation, by default, you will get a Uncategorized category.
Steps to Edit Default Category
- On dashboard, go to Post >> Categories
- Click on Edit/Quick Edit to edit the default category as shown in below image.

-
Delete Unwanted Default Theme
It is recommended to install the theme which you want for your blog and delete the unwanted theme. Deleting the unwanted theme will give you more web space and ultimately your blog will load faster.

To activate any of the installed themes, just hover on a theme to get Activate button. Click on Activate to apply selected theme.

To delete any among installed themes, click on any theme. Look for delete link and click on it to delete the theme from your blog server.

-
Install Plugins
You can install some useful plugin for your blog. Here I would recommend some below plugins while starting after fresh WordPress installation and giving a kick start to your blog:
- Akismet Anti-Spam: To prevent spam comment on your blog.
- Jetpack: It gives many useful features for WordPress blog like site stats, Widget visibility, Google Authorship, Subscriptions etc.
- W3 Total Cache: It improves SEO and user experience of your blog by increasing blog performance.
- BackWPup: Help to schedule automatic backup of your complete blog.
Steps to Install Plugin
- On Dashboard, click on Plugins.
- Here you can check your installed plugin.
- You can also activate, deactivate or delete the installed plugins.

- To add plugin click on Plugins>>Add New. Then search for the required plugin and click on install button for appropriate plugins.

-
Edit User Profile
Using this option, you can edit your personal details.
You can define your name to be displayed publicly.
You can change your password, email, website URL for your blog.
You can add detail to your author box and profile picture.
Steps to Edit User Profile
- Go to Dashboard, click on Users>>Your Profile
- Edit your details.

-
Dashboard Setting for readers, author, blog post and content
Setup General Setting
- This is one of the important settings you need to setup.
- The title of your blog and the tag line which defines your blog, are set here.
- You have to define URL for your WordPress blog.
- Here you can define who can register on your blog.
- Enter your email id, on which you will receive notifications when someone comments on your blog post or you receive feedback from contact us page.
- Define language and time zone for your blog.


Setup Writing Setting
Using writing setting you can define default category option for you blog article.
The important thing is Update Service option available on this page. This feature will let other people know when you update your blog post. By default, in Update Service textbox one site URL will be mention.
I would recommend adding below URL too to get wide network update services:
http://rpc.pingomatic.com
http://rpc.twingly.com
http://api.feedster.com/ping
http://api.moreover.com/RPC2
http://api.moreover.com/ping
http://www.blogdigger.com/RPC2
http://www.blogshares.com/rpc.php
http://www.blogsnow.com/ping
http://www.blogstreet.com/xrbin/xmlrpc.cgi
http://bulkfeeds.net/rpc
http://www.newsisfree.com/xmlrpctest.php
http://ping.blo.gs/
http://ping.feedburner.com
http://ping.syndic8.com/xmlrpc.php
http://ping.weblogalot.com/rpc.php
http://rpc.blogrolling.com/pinger/
http://rpc.technorati.com/rpc/ping
http://rpc.weblogs.com/RPC2
http://www.feedsubmitter.com
http://blo.gs/ping.php
http://www.pingerati.net
http://www.pingmyblog.com
http://geourl.org/ping
http://ipings.com
http://www.weblogalot.com/ping

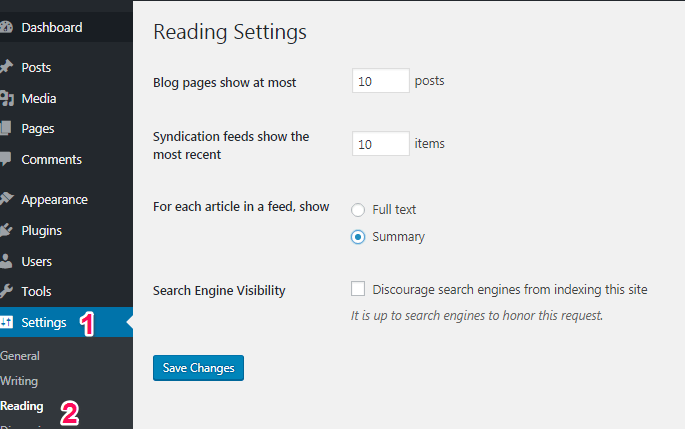
Setup Reading Setting
Reading setting help to setup, how your post should appear on the homepage. Just make sure below setting is done.
Setup Discussion Setting
This setup will help you to manage your reader interaction with your post. Likewise, whether they are allowed to post a comment? Who can post a comment? What detail do they need to provide as a reader? Etc.

Setup Media Setting
Here you can define the size of an image, you will be using in your blog post. Different type of image can have different size. Set it accordingly!

Setup Permalinks Setting
Here comes your blog post URL link format. Many newbies make mistake by ignoring this setting.
Make sure to set your permalinks setting as ‘Post Name’. This will create your blog article URL as your blog name followed by your post name. For example, check above address bar of your browser.

Conclusion
These are some simple but essential basic setting on your WordPress dashboard which needs to be done after fresh WordPress installation. I would like to mention one more point, this basic setting is the first step for your blog SEO. This one-time setup will help you in long run.
We will share more plugins, themes for WordPress which will help you to enhance your blog day by day. Do share your feedback


Add Comment