Would you like to build your own professional website for free? Of course, who wouldn’t!
But how?
Using websitebuilder.com!
About Websitebuilder.com
Websitebuilder.com is a tremendous website builder for businesses as well as individuals. It lets you choose from thousands of professionally designed templates. It allows you to create your very own blog or website for free.
The Reasons Why You Need Websitebuilder
With websitebuilder.com, you get:
- Your personal domain name: you get secure and reliable Web hosting that is included on all accounts. And you get a free domain name for your website as well.
- Custom domain: you also get to choose custom domain directly from the website. You can check the availability of custom domain from the site [Read how to choose right domain name], and buy it right away.
- Business email setup: you get to set up your own business email address that you can later add to your website.
- SEO tools: you receive simple and easy SEO tools to boost your website’s search engine rankings and to track significant traffic stats too.
- Quick e-commerce integration: you get simple and quick integration of a great e-commerce solution that allows you to make money and sell products at the earliest.
- Various packages: there are mainly four types of packages under special discounts—Personal, Premium, Business, and eCommerce. You can choose the package that matches your requirements the best. Premium features like email setup, SEO tools, priority support, and ecommerce store are not available in the Personal package; however, you can avail those features by means of the rest of the packages.
Note: take reference from the easy website builder blog for obtaining quick how-to guides to learn to use Websitebuilder correctly.
How to Utilize Websitebuilder.com?
Using and working with Websitebuilder.com is easy. You just need to sign up, and then log in to your account to start building your website. Let us take you through the entire process in a step by step manner.
Signing up for Websitebuilder
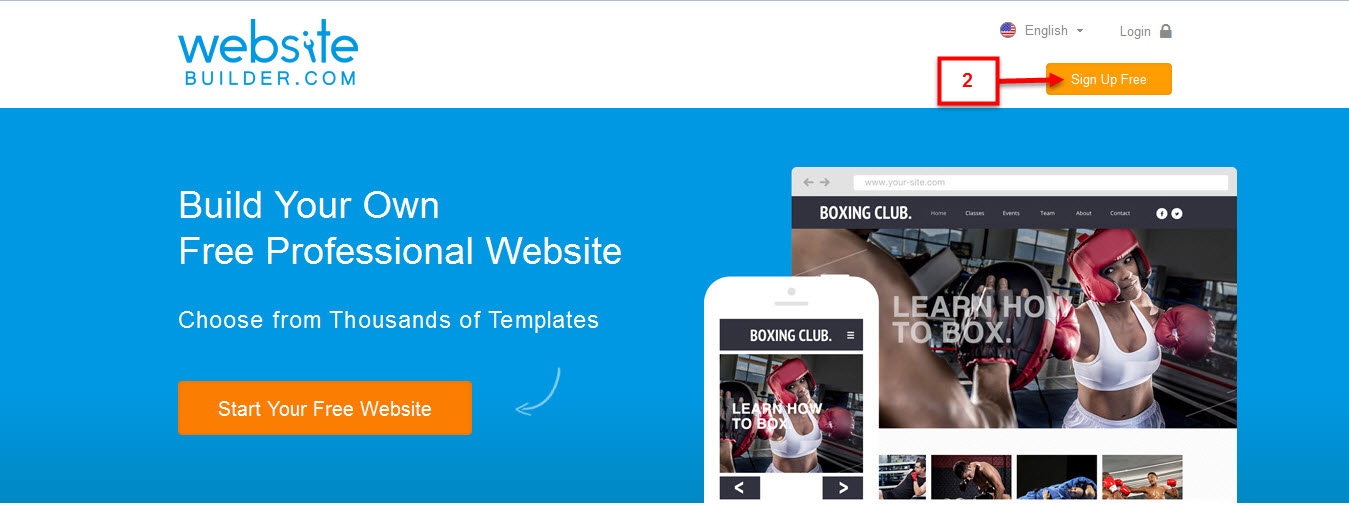
- Go to www.websitebuilder.com.
The Websitebuilder.com Sign Up page appears.
- Click the Sign Up Free button.
Then Start Your FREE Website Now page appears.
- Enter your full name in the Full Name text box.
- Enter your email address (with which you want to sign up) in the Email Address text box.
- Enter your password (for your account on Websitebuilder.com) in the Password text box.
- Click the Let’s Get Started… button once you have entered all the required details.

Logging into your Websitebuilder account
Once you have signed up for Websitebuilder, you need to log in to your account. Below are the necessary steps:
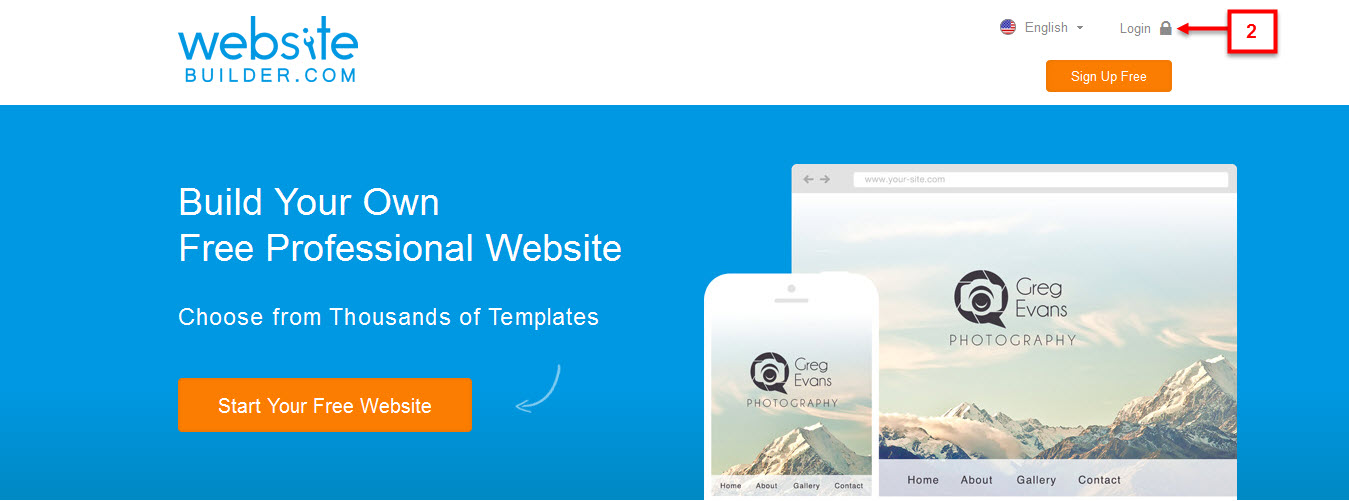
- Go to www.websitebuilder.com.
The Websitebuilder.com Sign Up page appears.
- Click the Login button.
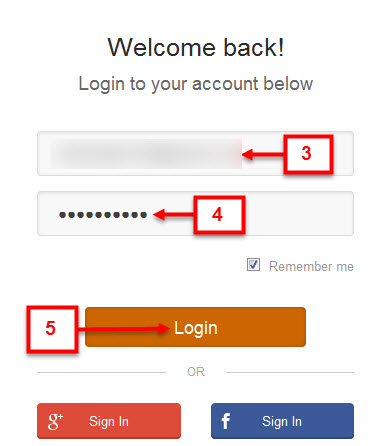
The Welcome back! Page appears.
- Enter your email address (with which you have signed up) in the Email Address text box.
- Enter your password in the Password text box.
- Click the Login button.
Then Choose a Template for Your Website page appears.
Sign up now!
Understanding the User Interface
Once you have logged in and the Choose a Template for Your Website page has displayed, you can see different options grouped under different sections that are in the left pane. In addition, you can notice a number of templates that are given along with the CATEGORY list box.

Let’s first understand each given section and the options grouped under the same briefly:
- Create a New Site: this button is self-explanatory. As the name suggests, you need to click the Create a New Site button to create a new website. However, you first need to choose a template on which your website will be based.
- MANAGE SITES: this section provides you the options to manage your website once you have created it. The section consists of three different options: My Sites, Domains, and Add Ons. The My Sites option allows you to view your websites. The Domains option enables you to get your personal domain name. And the Add Ons option lets you access diversified add ons that are meant to maximize the potential of your website.
- ACCOUNT: this section comprises the My Details option, which is a good way to give you quick access to your personal details. You can always go and edit your personal details by using this option, whenever you feel like doing it.
- MARKETING: this section renders you all the options that are necessary for you to market your website. Here are the various options: Stats, SEO Tools, Free Ad Credits, and Email Assist. You can use all these premium features to leverage the marketing of your site, after upgrading your website. Go through the different packages that are available on the site and pick the desired one to upgrade your website.
The Stats option permits you to check out the daily visitors coming to your website, measure your advertising return on investment, and monitor stats by means of Google Analytics. Next, the SEO Tools option enables you to increase traffic to your website, get free Google Adwords credits, and improve your search engine ranking.
Then, the Free Ad Credits option lets you obtain coupons for leading search engines for free, increase traffic to your website instantly, and enhance the prominence of your venture online. Further, the Email Assist option allows you to receive easy and quick email setup, instant email that your visitors can use, and a step by step guide.
Choosing a Template for your Website
Now that you have a fair understanding of the user interface and what each option is meant to do, you can begin by selecting a template for your website. Here are the steps:
- Select the CATEGORY list box drop down arrow.
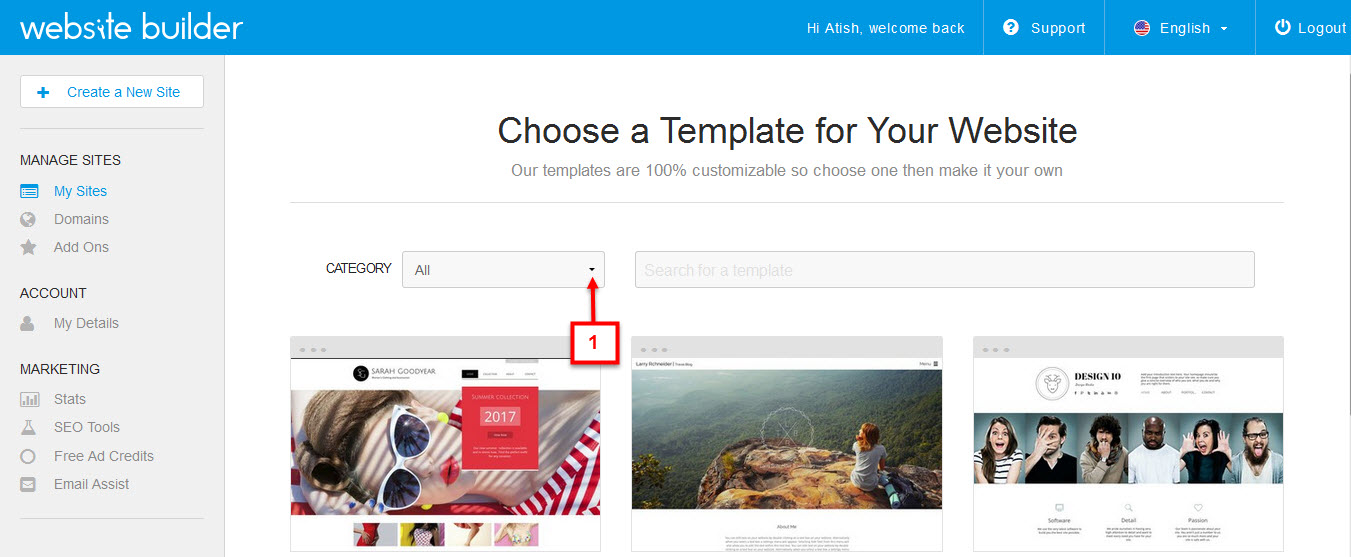
The drop-down list appears.
- Select the desired category of templates in the drop down list. In our case, we have chosen the Blog category.
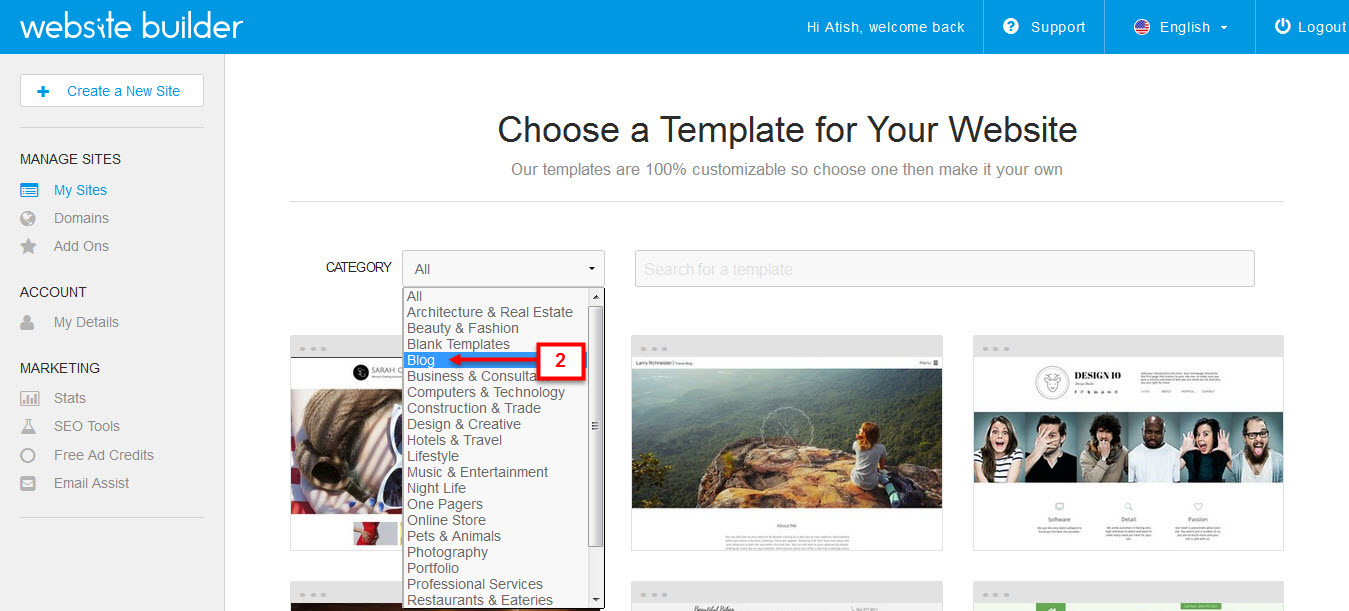
The corresponding blog templates appear.
- Locate the desired template.
- Hover the mouse over the desired template once you have located the same.
The Edit button and the Preview button appear.
Note: you can click the Preview button to preview the chosen template.
- Click the Edit button to edit the chosen template as per your requirements.
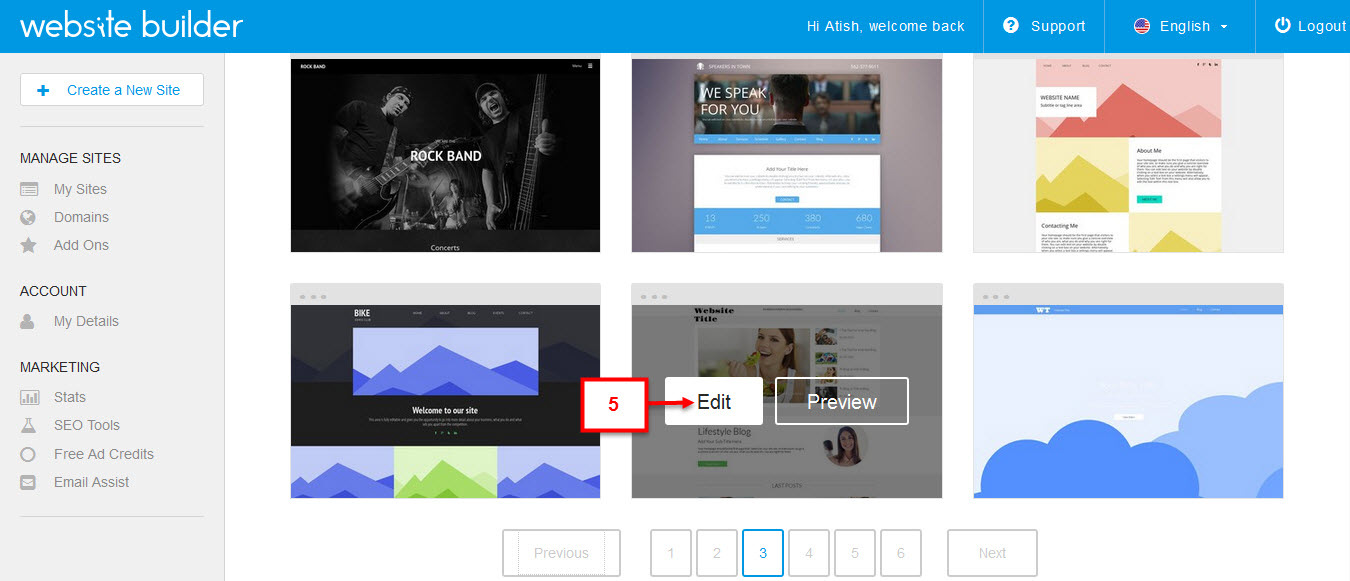
The site editor appears with the chosen template.
Editing, Saving, and Publishing your Website
In the site editor, you can customize the template that you have selected according to your preferences. Here are the basic steps:
- Click anywhere on the template, targeting the area where you want to change something like the text or the image. In our case, we have clicked on the Website Title region.
The Text section appears.
Note: with the Text section, you can edit the text, change the settings, change the style of the text, and select the desired size and position of the text.
- Click the Edit Text button.
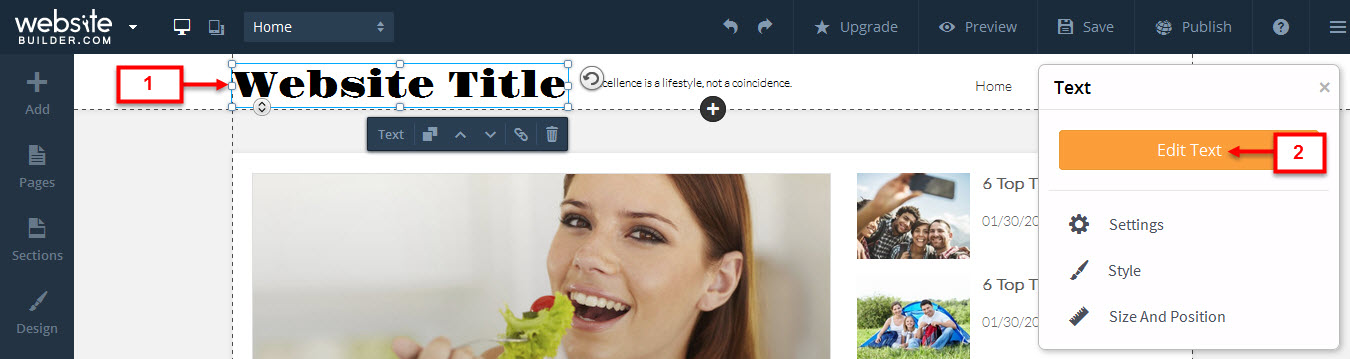
The relevant text formatting options appear.
- Edit the text accordingly.
- Format the text as per your requirements.

Note: make other changes like changing background of the section, header, footer, box, and others by performing similar steps.
- Click the Save button once you are done making the changes to your template.
The page for entering your domain appears.
- Enter the desired name for your website in the given text box that is vacant. In our case, we have entered healthnlifestyle.
- Click the Save my Site! Button.
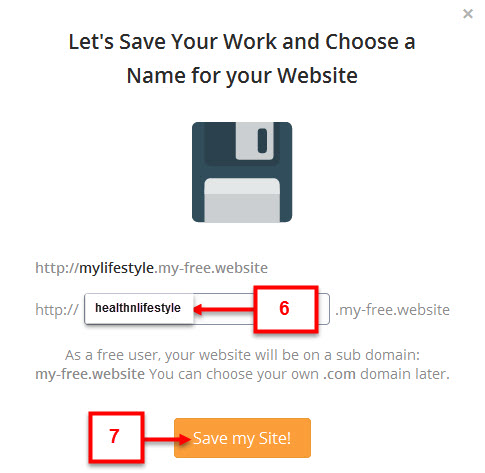
The confirmation message appears when your site is saved successfully.
- Click the Publish Now button to publish your site.
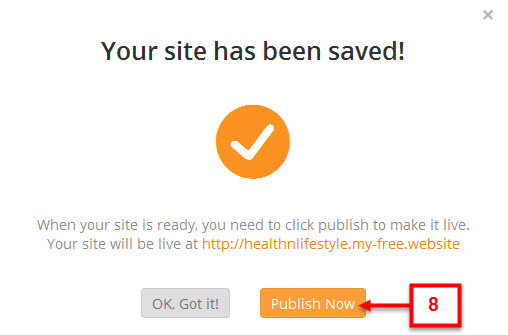
The confirmation message appears displaying that your site is live now.
Choosing a Custom Domain
Once your site has been published, you need to choose the domain name for the site. Perform the following steps to do the same:
- Click the Choose Domain button.

The page for choosing your domain appears.
- Select the desired domain from the given list box.
- Click the Get Domain button.

Note: to get your chosen custom domain, you need to upgrade to premium plan.
Verdict
That’s all folks. We have tried to cover all the necessary steps to help you build your website using Websitebuilder.com, which is undoubtedly one of the best website builders available at present.
Now, all you need to do is follow these steps and create your very much needed professional website immediately.
Sign up now!


Very nice post Atish, everyday many people are searching for good platform to develop website or blog for free, your post is really helpful.
Regards
Mukesh
Hello Mukesh,
Thank you for checking out this tool, and sharing your comment.
It’s great that web site building is so easy these days. Platforms are becoming more easy to use and feature-full due to jQuery add ins etc. I have built websites from scratch using html, css, jquery, php and it takes alot of time, too much time really.
Thanks for the guide, it will be a heads up to those looking for an easy option.
Yes Douglas, hard coding takes a lot of time, but these website builders are really helpful. You can create a normal site in few hours.
Hey admin, Nice article. Best for those who has not any technical knowledge about scripts and all that. That will help to those people and build their own site with in minute.
Thanks Rahul
Really helpful and informative post. Thanks for sharing such a great post. I recognize this post because you have told full method of creating website in details. Moreover, if we know html, css or javascript, we will be able to create more responsive and beautiful website.
Very Nice article Atish !
it is really useful & helped for those people who want to develop website or blog for free, Thanks for Sharing such Amazing Steps for creating a website.
You’ve done a comprehensive review on Websitebuilder Atish, thanks!
Even though it is possible to create the attractive websites through DIY website builders. I would like to gain coding knowledge so that I can modify the CSS and HTML to add personalization effects to my web page.
The features of the websitebuilder looks good and you’ve nicely explained on how to choose the templates.
Keep your good work, have a relaxed weekend.
Thanks for the comment.Site builders are really great as they help create websites in just few hours.
Hi Atish,
Thank you for showing us how easy it is to set up Websitebuilder. You make it sound so simple Atish..
You are so smart. You definitely covered all the steps necessary to use this unique program.
I had my site set up by a designer who did a great job.
You have an awesome weekend!
Linda
Hello Linda,
Yes its easy to set up a site with websitebuilder. Glad you liked the post, and yes thanks for the good words.
Hi Atish,
Genuine and Useful review for creating a website. This will be surely helpful for person’s who are trying to create a website. To Launch a website, we need to select domain, hosting, server etc. Here, they are providing all the important feature’s like SEO, Templates, Hosting within the same place.
Anyway thanks for sharing this.
Hello Nirmal,
Yes, this is useful for those who want to create websites within a short span of time. They provide all in one solution to make things easier for the users.
It’s great that web site building is so easy these days. Platforms are becoming more easy to use and feature-full due to jQuery add ins etc.Very nice post Atish, everyday many people are searching for good platform to develop website or blog for free, your post is really helpful. 🙂
Thank you Sneha.
Hi,
I nice post. I personally use Blogger and WordPress for a creating a Blog but for a static site they are not a very good choice. For those who want to create a static site should go for such Website building Sites. As you discussed a new site so it will be helpful.
I want to ask a question. Does this site make your new site SEO optimized?
Waiting for your response.
Thanks!
Yogesh,
You can create static sites on blogger and WordPress as well, you just need to tweak the code a bit.
Any site you create, that can be optimized by you and not by the CMS. It’s you who does keyword research, keyword distribution, interlinking and other optimization tasks.
Thanks for coming by!
It’s extraordinary that site building is so natural nowadays. Stages are turning out to be all the more simple to utilize and highlight full because of jQuery include ins etc.Very pleasant post Atish, ordinary numerous individuals are scanning for good stage to create site or online journal for nothing, your post is truly useful.
Hi Adeel,
Thank you for sharing your views with us.
That’s seems pretty. This will be work as a miracle for non coder people who want to make website for their smaal business.
Hi Atish,
I am a new blogger and it took some time for me to select a theme and then change to another so and so. Yesterday I have successfully posted a post but still not completely satisfied as I am still confused about these plugins and all. This post of you on web builder will definitely help people like me and thanks a lot for the sharing.