If you are a smartphone user for a longer enough period, you should be aware that the iOS operating system is one of the most secure ecosystems out there. That would indeed make it a completely closed system and thus transferring the data from an iPhone is the toughest ever challenge you would ever face. But, you need not fret. There are a few solutions that tend to make it easy for you. We will discuss a few solutions that would help you transfer data from iPhone to Android a completely easy affair.
How to transfer data from iPhone to Android?
Well, now that you have chosen to opt to make a switch from iPhone to Android, let us check a few methods that can be used to transfer data from iPhone to Android through easy steps.
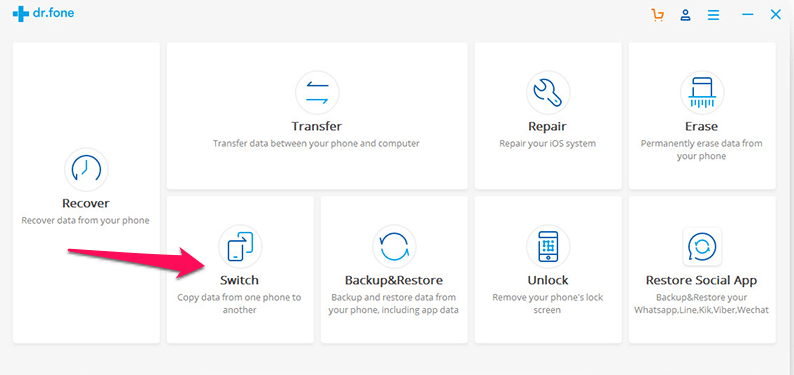
Method 1 – Use Dr.fone 1-Click Solution to transfer data from iPhone to Android
The first and foremost method we found to be useful in dealing with the task of transferring data from the iPhone to Android. The tool we would be using is Dr.fone -Switch.
Here are the steps you need to use this tool to transfer data.
- Download and install Dr.fone on your computer. You can download it from the official link
- Launch Dr.fone recovery tool on your device.
- On the homepage, click on the Switch option.
- Connect both of your devices to the computer using the USB cable. Both iPhone and Android should be detected and shown on the tool interface.
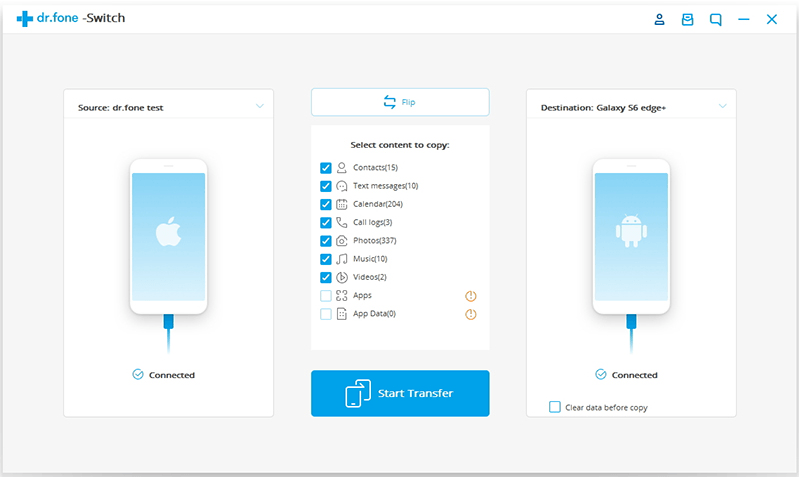
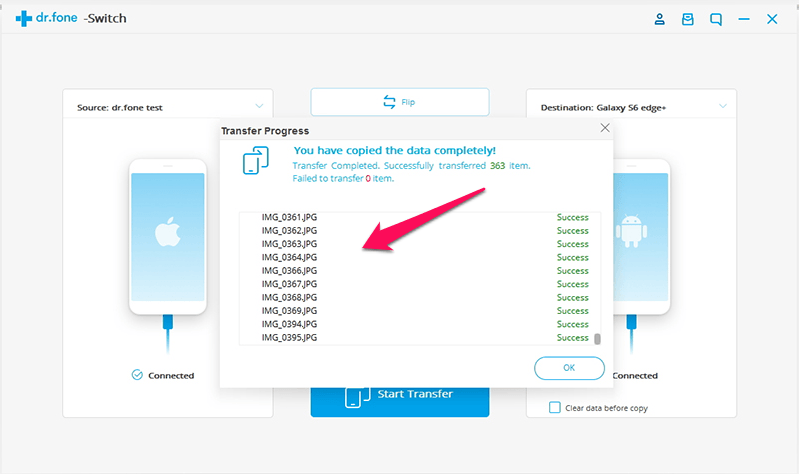
- Select the files and other data you want to transfer from your iPhone to Android device and click on Start Transfer. Your files should now be copied. Once done, you will be prompted with a confirmation dialogue box.
- Wait patiently till the file the data transfer from iPhone too Android is completed If your Android device has any unneeded files saved, you may check the box for Clear Data Before Copy option.
That should do it. You have successfully completed the data transfer from iPhone to Android. Your task of iPhone to Android transfer is completed with just a simple One-Click operation without much you have to do. Ensure that you have signed in to your accounts like Facebook, Twitter, and similar other profiles so that contacts within them is copied and transferred.
Method 2 – Transfer data from iPhone to Android using iCloud
One of the most important data that you would want to transfer from your iPhone to Android should ideally be the contacts you have saved on your iPhone. Unlike Android to Android contacts transfers that can happen through the Google Account integration on your Android device, transferring contacts from an iPhone may be a little difficult task.
However, syncing your contacts to a cloud service like iCloud on your iPhone can help you retrieve your iPhone contacts on your Android device easily.
Follow the steps for transferring contacts from iPhone to Android –
- Launch the Settings app on your iPhone and head on to iCloud
- Turn the sync on if it is not already syncing. Make sure you have chosen Contacts to sync.
- You may also choose the other data that you would want to sync with your iCloud and thus transfer it to Android.
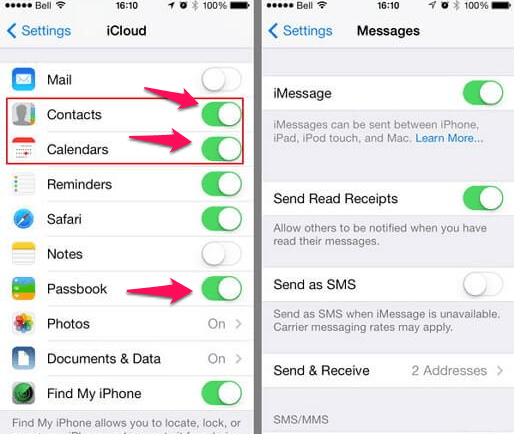
Please note that the interface on your iPhone may vary depending upon the iOS version on your iPhone.
- Launch your favourite browser on your PC and login to your iCloud account.
- Enter the Contacts management panel and export the contacts in the vcf format to your computer.
- Once done, connect your Android and copy the vcf file to your Android device.
- Launch the Contacts app on your Android and under the settings, choose Import from SD card.
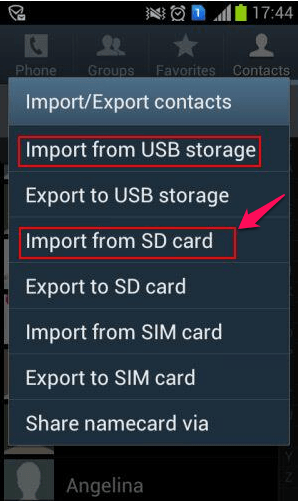
The interface may differ depending upon your device manufacturer, model and the launcher customisation on your Android device.
Method 3 – Transfer the Media content from iPhone to Android
If you are interested in data transfer from iPhone to Android with respect to your media content alone, you may use iTunes for the purpose.
Here are the steps you would need to follow:
- Launch iTunes on your computer. We assume you have downloaded and installed iTunes on your PC.
- On your iPhone, tap on Store and then on Authorise This Computer.. Ensure you have input the correct Apple ID and password.
- Connect your iPhone to your computer and launch iTunes.
- Right click on your iPhone model and choose Transfer Purchased from the context menu.
- This will transfer your media content to iTunes.
- Now, connect your Android device, and let it get detected.
- Navigate to the iTunes folder on your computer. The path should ideally be C:Users -> Administrator ->Music -> iTunes ->iTunes Media.
- Copy the media files you would want to transfer to your Android and save them on an appropriate folder on your Android device.
Please note that if there are any tracks or files that are DRM protected, you may not be able to access them on your Android device. You will either need to skip those files or opt for a DRM remover software.
Method 4 – Use Google Account to transfer data from iPhone to Android
Google account or Google Photos can be one of the best options to transfer your media content from the iPhone to Android.
Here are the easy steps that would help you achieve it:
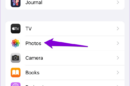
- Download and install Google Photos on your iPhone
- Launch the app and sign in with your Google Account
- Navigate through the settings and choose Backup and Sync.
This will sync all your media content to your Google Account. You can simply log in to your Google Photos app on your Android device and sync it back and download your photos back on your Android device.
The Parting Thoughts
Well, iOS and Android are the two completely different and independent ecosystems as long as mobile operating systems are concerned. That would make it a little difficult to transfer data from iPhone to Android. The methods we have discussed above should help you tide through this difficult task in an easier manner.
Having said that, we would consider the Dr.fone – Switch to be an excellent option as it simplifies the task. In fact, unlike the other methods we discussed here, the Dr.fone – Switch can perform all the data transfer needs in a simple One-Click operation. You can use it to transfer a host of data through a few simple steps – without any need for transferring the data through individual options for each of the content types.


Hi
Timmappa,
Happy to know about the tricks to transfer data from iPhone to Android. I used to think that transferring data from iPhone to Android is a very difficult task. You have well explained the step by step process to transfer data from iPhone to Android by using different methods. This is a very useful post and I will share it.
Thanks for sharing this post with us.
Have a great day.
Praveen Verma