As we all know how Google Sheets or Spreadsheet help in out day today as well as official work. It made our workflow so much easier and connective. Before we go ahead and talk about how to remove gridlines in Google Sheets let’s have a look at the few reasons to use Google Sheets.
Here are 8 reasons on why you need to use Google Sheet or Spreadsheet:
-
- Google Sheets are Free in comparison with Microsoft office.
- Google Sheets or Spreadsheets are cloud-based, which gives much more accessibility.
- Google gives limitless storage for the spreadsheet; it doesn’t require you to save the version on your desktop.
- The spreadsheet allows collaboration, and more than one person can access & edit simultaneously.
- The spreadsheet provides more powerful tools with Graphs & Tables.
- As it’s a cloud-based platform by googling, it also integrates with other Google services.
- If you are looking for more data in your datasets, then the spreadsheet is the best option as it provides a 2 million cell limit.
- Google spreadsheets also enable to use of Apps Scripts and VBA.
What are Gridlines in Google Sheets?
Gridlines are lines that are present in the google sheet, which makes it look cleaner. They help to provide a structure to the sheet and are also known as row separators or column separators in a sheet. Gridlines help to differentiate cells in a spreadsheet.

They provide ease for the spreadsheet user while navigating through the sheet. Gridlines help to organize our data. In a google sheet, they are, by default, added to a grid. Sometimes we do not want these gridlines. They may be confusing at times.
They tend to create confusion when you are using images. Although they provide a clean structure at times, we do not need them. We do not require rows and columns everywhere. Since we do not need them, we can either delete or hide gridlines. So in this write-up to let us see how to remove gridlines in a google sheet.
Why Do We Need to Remove Gridlines on Google Sheets?
Is the presence of extra grids making it difficult to reach your look expectations for your sheet?
Greeds help us to create and organize our data systematically, but when it comes to presentation, gridlines don’t look well. Removing gridlines from the whole sheet or a specific cell will help us get out of the desired look.
As we are using Google Spreadsheets, it gives much more flexibility for presenting our data, thus spreadsheets not only provide the function of removing gridlines, but we can also style and change the color of the whole gridline sheet or a single cell.
How to Remove Gridlines in Google Sheets?
Don’t worry; here are the steps for how to remove gridlines in a google sheet.
Step 1: Once you open the spreadsheet at the top, you can find a toolbar, as shown in the image.

Step 2: Click the view section on that toolbar.

Step 3: You will get a drop-down that contains a gridlines button, as shown below. Untick the gridlines button.

Steps to Remove Gridlines in a Mobile App
By using the above steps, you can remove gridlines from a web browser. While using mobile apps also we can remove the gridlines. Here are simple steps for how to remove gridlines in a google sheet while using a google sheet.
Step 1: You will find tabs in a google sheet. Select one tab. Besides the selected tab, you will find a down arrow. Click on the down arrow, as present in the below image.
Step 2: When you click the arrow, you will find a drop-down, as shown below in the image. Scroll the drop-down until you find the gridlines option. Now you can remove the gridlines by un-toggling the gridlines.
Steps to Print the Spreadsheet Without Gridlines
Although you remove gridlines using the above steps, they will still be present when you are printing. In case if you do not want gridlines while printing, you have to follow the following steps.
Step1: In the toolbar present at the top of the spreadsheet, you will find the “FILE” menu.

Open the file menu. There you can see the print option. Click on the print option.

Step 2: Once you click on the print option, you can see the “FORMATTING” present there. Expand the “Formatting“.

Once you expand, you can find the “show gridlines” button. Unselect the Show gridlines option, as shown below in the image.

Step 3: After this, click on the “NEXT” button present on the top right corner of the page, as shown below in the image. By clicking the next button, you can see the print page where there will be a print option, as shown in the image. Using this, you can print the sheet in your desired way.

Remove Selected Gridlines
In a sheet, we do not want to remove all the gridlines. At places, we want to add them. Google spreadsheets even provide that facility. In a spreadsheet, at times, we want to highlight some things. For that, you can use these selective gridlines. Although you use these selective gridlines at places, the other places can have free-flowing text.
Before applying the grid for selective places, first, you have to disable the gridlines altogether. You already know the steps for how to remove gridlines in a google sheet. After that, you can follow the below steps to apply the grid at selective places.
Step 1: Select the cells in the spreadsheet for which you want to apply gridlines, as shown in the image.

Step 2: After that, click the borders button present on the toolbar, as shown below.

Step 3: After clicking the borders, the button clicks the below border button. Once you select that, it will apply borders for the selected cells.

In this article, you have seen how to remove gridlines in a google sheet and print a sheet without gridlines. You can also find how to add gridlines for specific cells. By following these simple steps, you can modify your sheet within no time. Follow these simple steps and meet the design requirements of your sheet.
Adjust Border width in Google Sheets
Like most tasks inside Google Sheets, changing the border width is pretty basic. Choices for expanding border-width are limited. Yet, there are enough decisions to let you make a table stick out.
- Select the cell for which you need to build the border width.
- Select the Border option from the top bar menu.

- Select the border style option.

- Select the border choice you need from the popup menu.

That is all you need to do! Your chose cells should now have an alternate style of borders around them. You can rehash these means for any cell choice of any shape you like.
Change Border Color in Google Sheets
Another way to make a table attractive is to change the cell border color from the standard black. It permits the cell to jump out of the screen and makes its main focus. This is ideal if you have the key data you need to show and stress outwardly.
- Select the cell range to extend in case you need to adjust.
- Select the Borders from the toolbar menu at the head of the spreadsheet.

- Choose border color on the right of the popup menu.
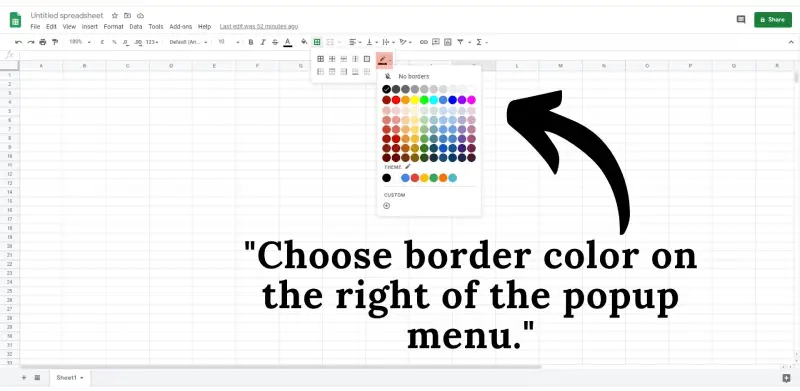
Your table should now have an alternate coloring border and stand apart from the remainder of the sheet. It is a decent approach to ensure the data you need will get the attraction it deserves.
Conclusion
Using Google services such as Google Sheets or Spreadsheet help in both our day to day work as well as official work. Though the grid lines come as an extra benefit, sometimes they seem to be a barrier in our work and distract our attention. Thus, to do a better presentation, it is better to remove the gridlines on google sheets.
So, follow how you can show or hide/remove the gridline from your sheet. Just choose from one of the above following methods to best suit your needs.


Add Comment