WordPress is one of most popular CMS, developers are constantly developing plugins and themes to make hectic work easier. If you are starting your blog using WordPress CMS then you will get exposure to unlimited free or paid plugins. Here I will show you how you can install a plugin on WordPress blog.
Please note that you can’t install a plugin if you have your blog on wordpress.com. To install plugins you must be using self-hosted WordPress blog.
There are total 4 easy ways to install a plugin on WordPress blog:
- Using search option on WordPress dashboard
- Using upload on WordPress dashboard
- Using file manager
- Using FTP
Four Easy ways to install a plugin on WordPress
-
Search and install using WordPress dashboard
- Login to WordPress dashboard and go to Plugins>> Add New
- Search for plugin name using search box at right of your screen
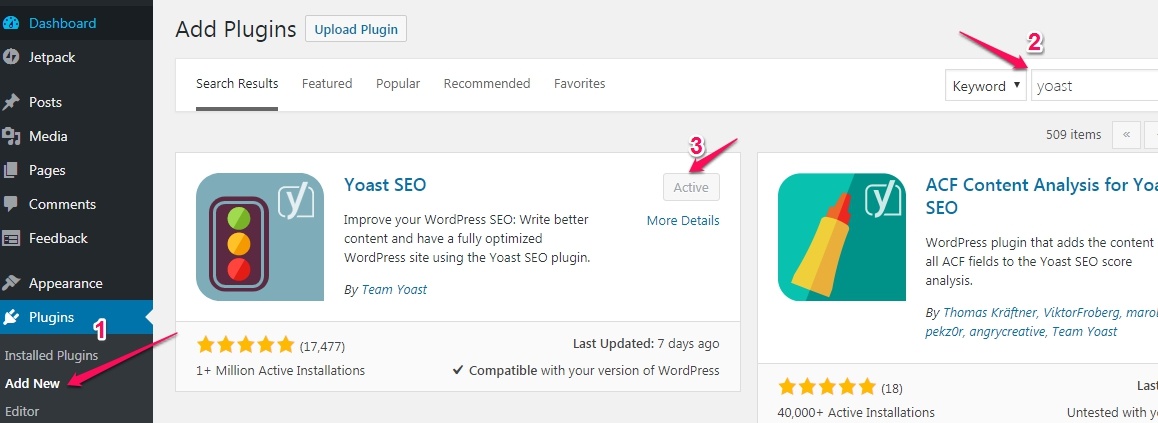
- Once the search plugin appears under search results, click on Install button to start the installation.
- Finally, you have to click on Activate button to see its effect.
-
Upload and install using WordPress dashboard
- Login to WordPress dashboard and go to Plugins>>Add New
- Click on Upload Plugin button and choose zip file of plugin using Choose File option

- After selecting file click on Install Now to install a plugin.
- Once the installation is completed you have to activate the plugin. Plugin won’t work until you activate it fromPlugins>>Installed Plugins
-
Upload and install using file manager
- For using file manager you have to log in to your control panel of your host provider.
- Check for File Manager menu in control panel and navigate to home>>wp-content>>plugins folder and click on Upload button to upload a zip file.
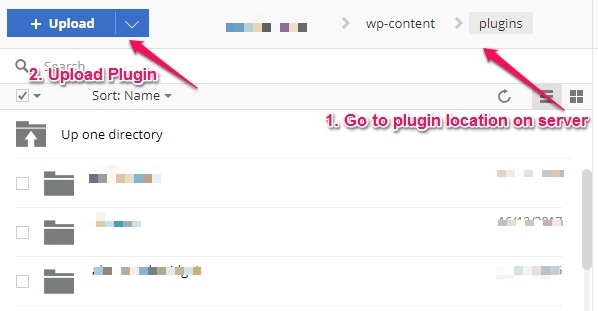
- After uploading zip file you can unzip it on a server.
- Once a file is unzipped you can go to WordPress dashboard and check in Plugins>>Installed Plugins list and activate it.
-
Upload using FTP
- To use FTP, you need to install a utility called FileZilla or any other utility which helps to connect to your host server for file transfer.
- Login to Control panel of your host provider and check for FTP/SFTP menu. From here you will get login credential to be used while accessing host server through FileZilla.
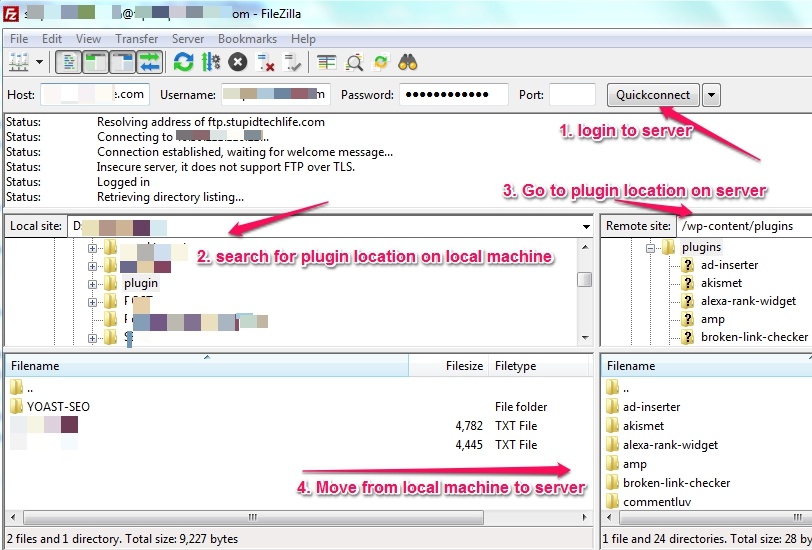
- As shown in above screenshot you have to first login to the server using credential you got in above steps. Search for plugin folder on you location machine and go to /wp-content/plugins folder on a server. Finally, move plugin unzip folder from the local machine to server.
- Once the file transfer is completed you can check plugin in WordPress dashboard in Plugins>>Installed Pluginslist. At last, activate the plugin to see its effect.
Using this 4 easy steps you can install any plugins which are supported by WordPress platform. Every time you install a plugin, make sure to activate it from Installed Plugins list on WordPress dashboard. It is highly recommended to take backup of your database and files before you install or update any plugins on your blog.


Hi ShivKumar, aka WordPress Guru Thank you so much i was finding this type of post to understand wordpress. your post really help me. Keep doing Buddy