Yoast SEO plugin is one of the most important plugins to install on your WordPress blog for SEO purpose. This plugin makes it very easy to do SEO which is utmost important for a blog. This article is going to be a bit longer as I will go through each and every option of Yoast SEO plugin.
This is a complete guide to understand and setup all important settings in Yoast plugin to do better SEO for your blog’s home and internal pages. It is a fully fledged plugin which includes all possible settings for your blog’s SEO. The very first step is to install Yoast plugin in your WordPress dashboard. so, continue reading to know everything about this awesome plugin.
STEP TO INSTALL YOAST PLUGIN
- Go to Plugins Menu >> Add New
- Search for Yoast SEO using plugin search option
- Click on install then activate it once it is installed.

ACTIVATE ADVANCE FEATURE OF YOAST PLUGIN
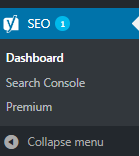
Once you activate Yoast plugin, you will get a basic options of Yoast plugin in your dashboard as shown below.
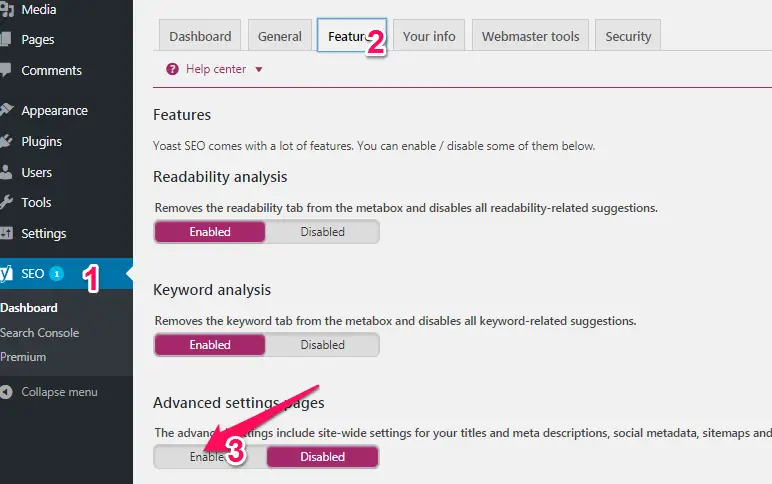
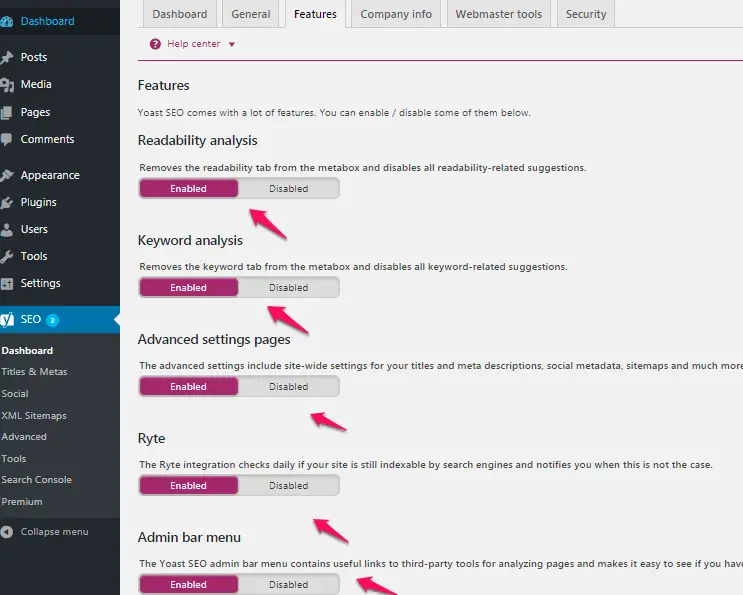
As I would show you to setup complete Yoast plugin, first I will show you how to enable an advanced feature of Yoast SEO plugin which is also the key feature it. In SEO menu go to Dashboard >> Feature, check for Advance setting pages and enable it. Remember to save the changes to see the effect.
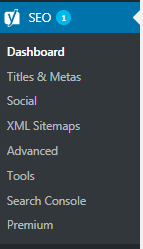
Once you enable Advanced Setting page and save the changes, you will get the advanced options in under SEO menu as shown below.
Now I will take you through each and every option of Yoast SEO. Let’s start with the dashboard.
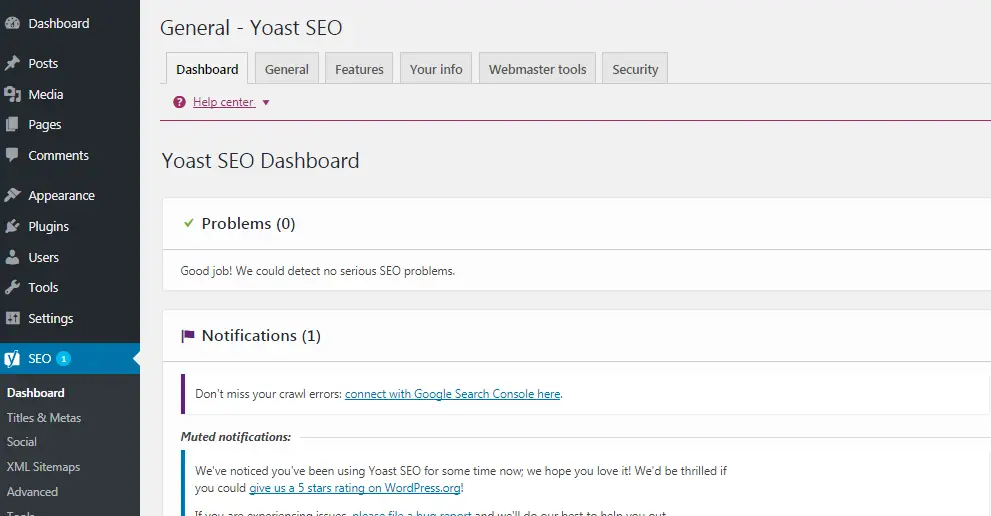
DASHBOARD
There is nothing to setup on a dashboard. It will display some notification if there is something to bring to your notice as per Yoast.
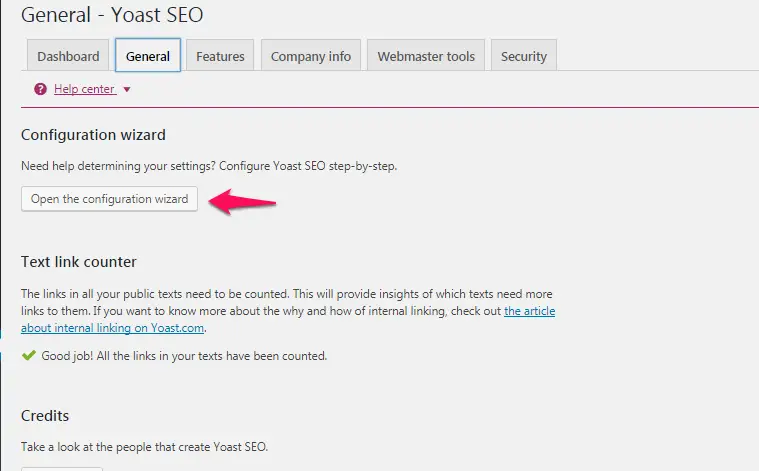
General
In General tab, you can use ‘Open the configuration wizard’ to setup SEO. It will show you a similar option on a new webpage to configure setting step by step. You can skip this tab too as I am going to show you each and every option one by one.
Features
I have already used one option from this tab. By default, everything is enabled. If anything is disabled then you can enable it and save the changes.
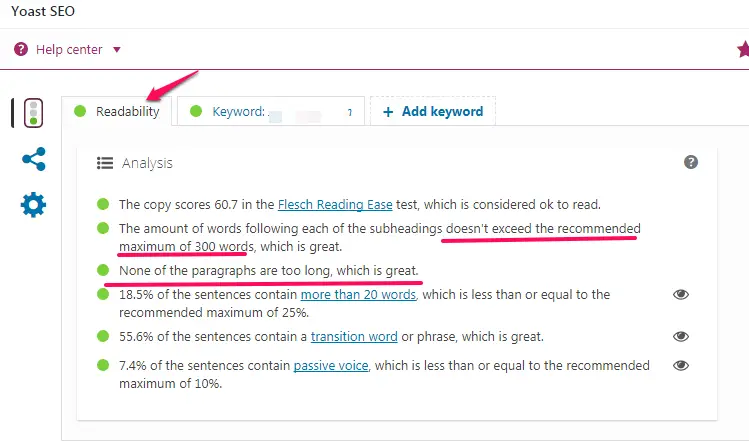
Readability analysis: If you enable this it will check and analyse the length of an article written(Length of an article) and how easy it is to be read. And on the basis of the analysis, it will give scrore. You can improve by considering their suggestions as you can see below:
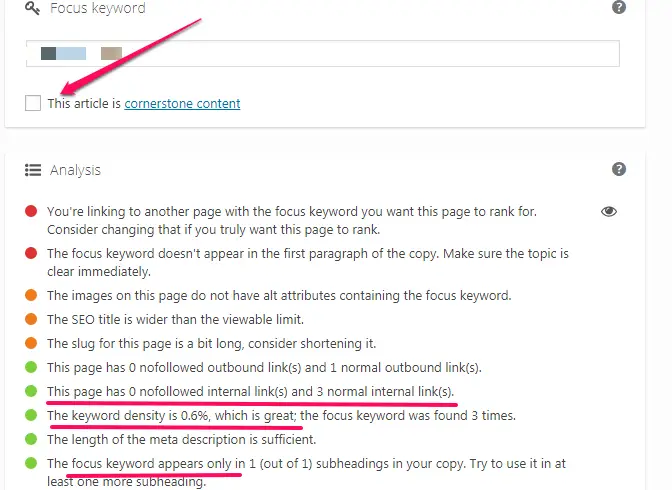
Keyword analysis: If you enable this option, keyword analysis tab will be active while you are writing the article.
Cornerstone Content: This will allow marking most popular, well-written article as a cornerstone. Such post is more likely to rank high in search engine.
Text link Counter: It will count a number of internal links and external links use in an article.
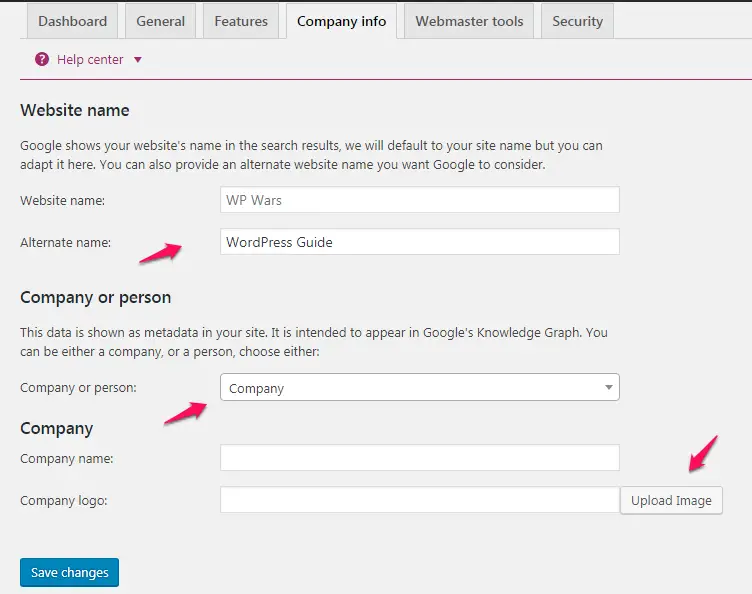
Company info
In this tab, you have to mention your blog name/alternative blog name. Your site name can be your blog’s title name. This name is used by the search engines when it appears in a search result page.
You can also mention about company/person behind this blog. If it’s company then you can write your company name and upload the company logo.
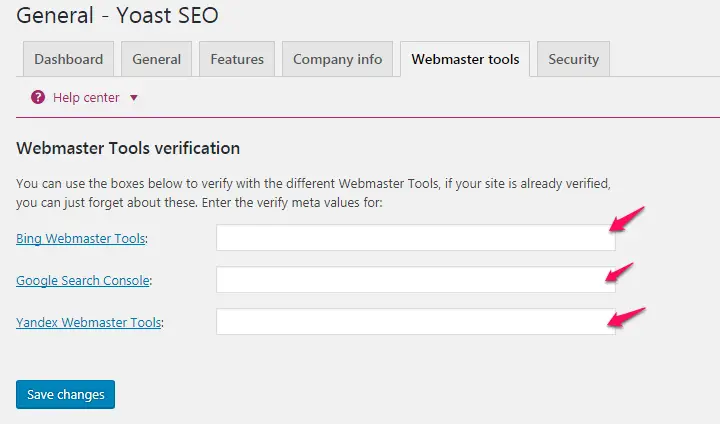
Webmasters tool
Webmasters tool is another important setup one need to do to complete SEO setup. The popular search engine like Google, Bing etc allow us to register our blog in search engine. You will get Meta code from the search engine after successful registering, use that respective search engine Meta code in Yoast webmaster tools option.
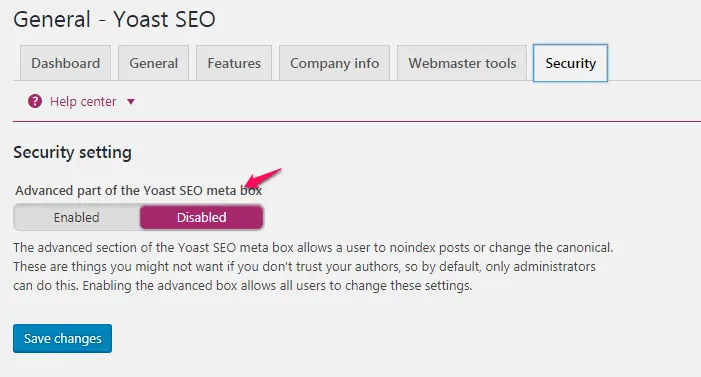
Security
By default advanced part of the Yoast SEO Meta box is disabled. If you enable this option then non-administrator user will be able to change setting like noindex to post and canonical setting of the post. I would recommend keeping it disable so that only administrator will have privileges to make such changes.
TITLES & METAS
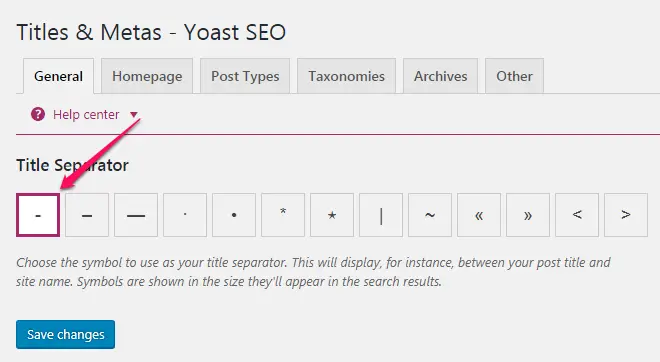
General
You can select the type of title separator for your blog. This separator will appear in a title bar of your blog post/page as shown in above screenshot. You can define the separator from the General tab of Titles & Meta menu option.
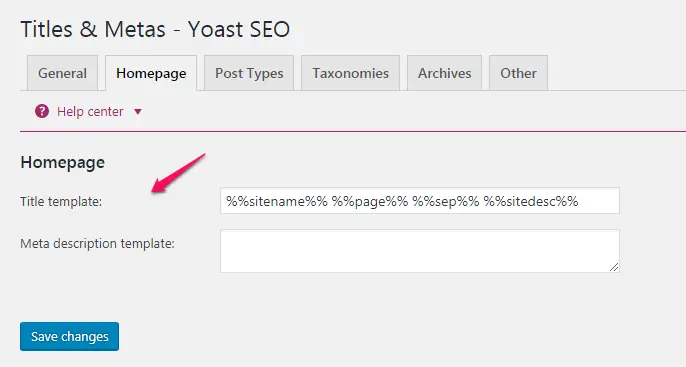
Homepage
You can define title template for your homepage. This you can see in a title bar of the browser when your homepage is opened in the browser.
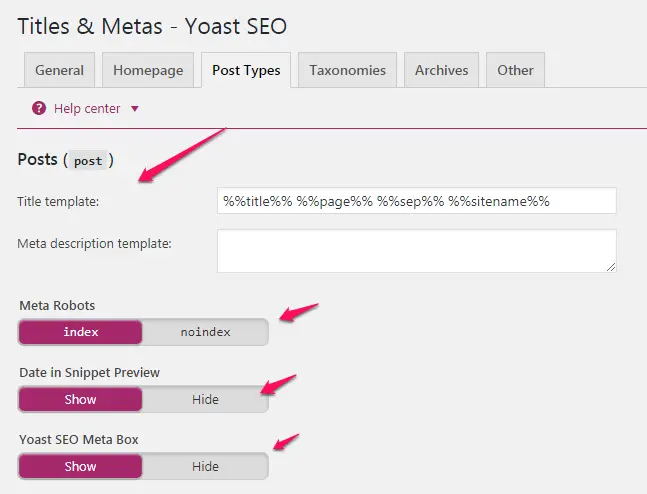
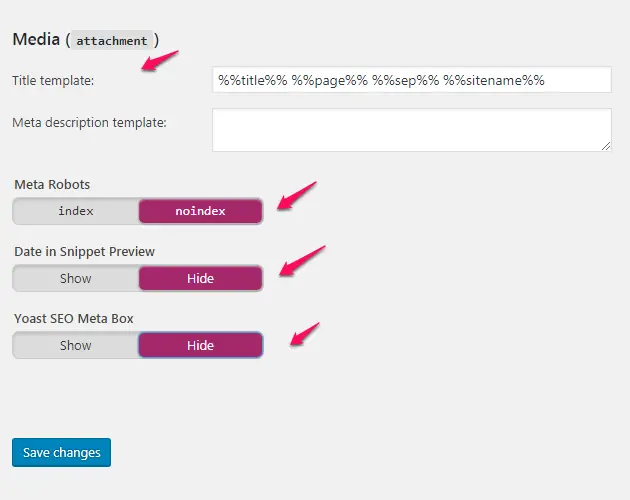
Post Types
In this section, you can define title template for page, post, and media. You can also setup meta robot (index/noindex, Data Snippet preview, SEO Meta box) for a page, post, and media as per SEO. I recommend enabling this option for the post, disable for media as shown in below screenshot.
Title template can be overridden while writing an article. If you forgot to mention SEO title for page or post then it would pick as per title template define in Yoast plugin.
Don’t forget to save the changes to see the effect.

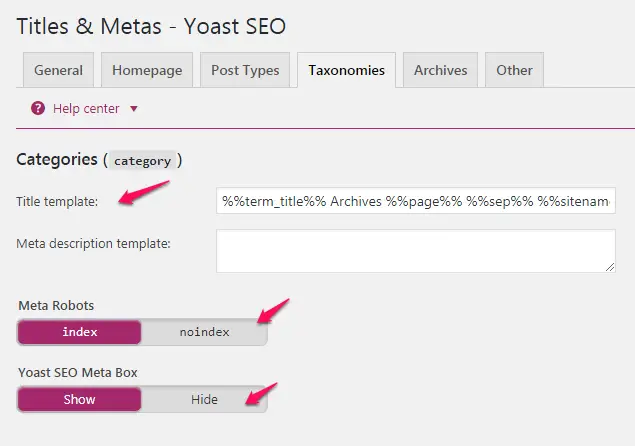
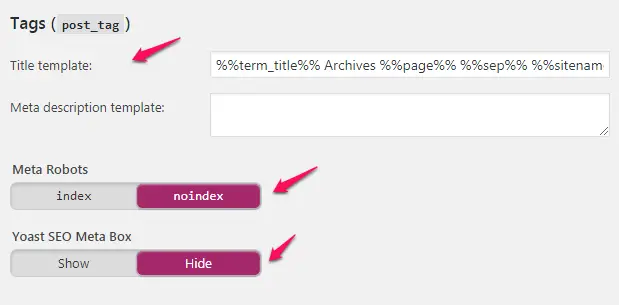
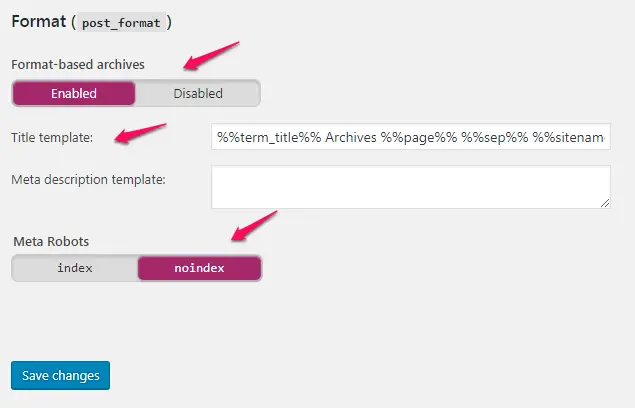
Taxonomies
Taxonomies contain similar setup for categories, tags and format. You can setup this section as shown in below screenshot.
Don’t forget to save the changes to see the effect.
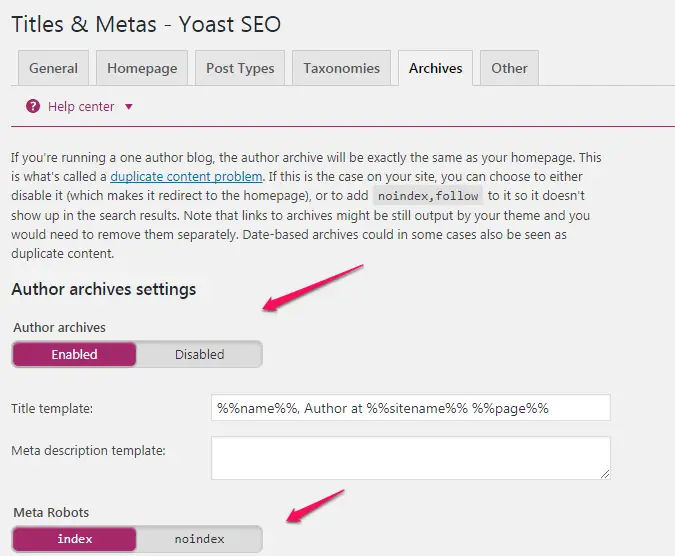
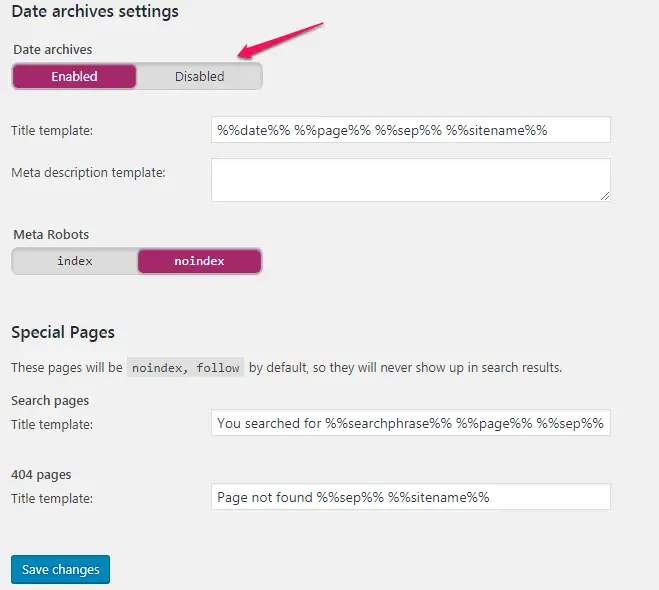
Archives
An archive is done with respect to author, date and pages. Author archive may act as duplicate content if you are running single author blog. In many cases date archive also acts as duplicate content. If you are running single author blog, I would recommend disabling this option to avoid duplicate content.
After changing any of these options, click on save button to reflect the changes.
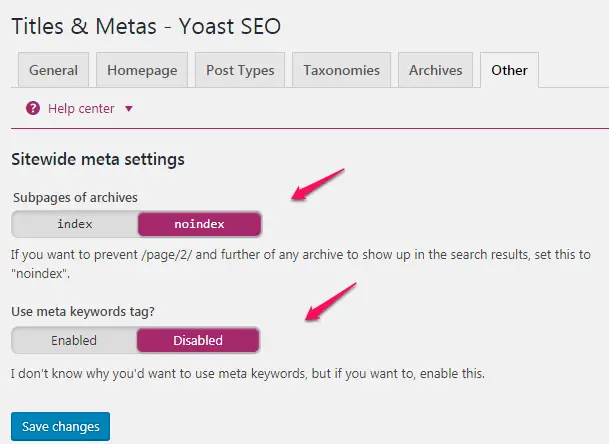
Other
Set the setting in this section as shown below. Disabling this option will help to noindex next page option like /page/3/ from appearing in the search engine.
SOCIAL
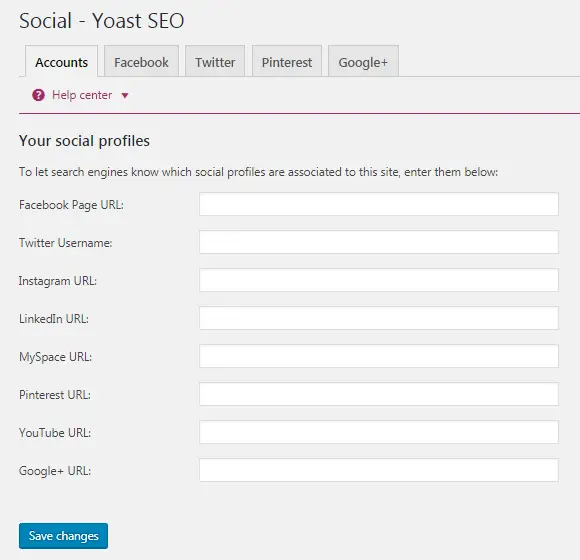
As I have mentioned that Yoast plugin is fully fledged with many features. It also contains Social menu which will link to different social media site like Facebook, Twitter, Pinterest, linkedin, Google+ etc. You just need to mention you social page URL or userid in the respective textbox.
Account
Enable Facebook open graph option, this will add Facebook open graph in your blog head section. Now if anyone shares your post/ page then the social site will use this data while sharing.
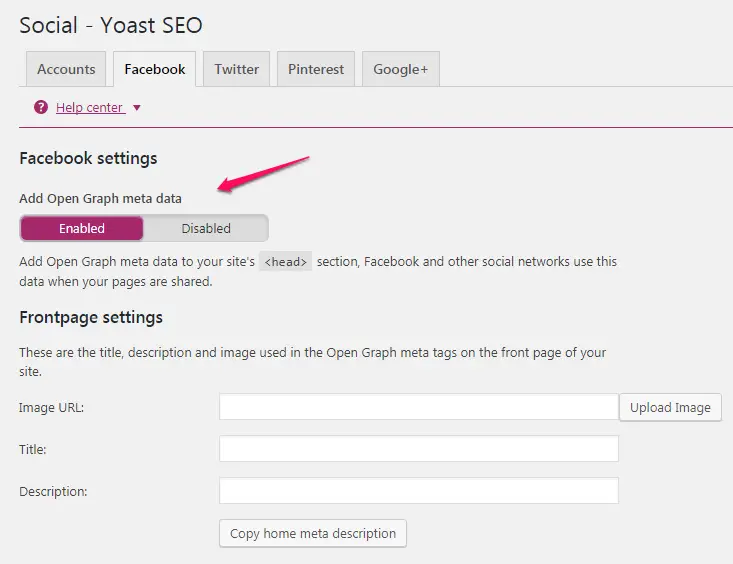
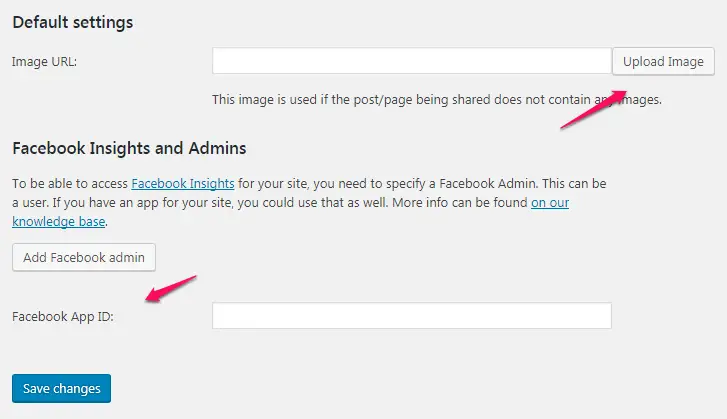
Add front page setting for Facebook with image URL, title and description. I recommend adding your banner image here since this image is used when your homepage is shared on social site.
Upload thumbnail size image of your blog logo. This image is used for an article which doesn’t have any image in the article to display.
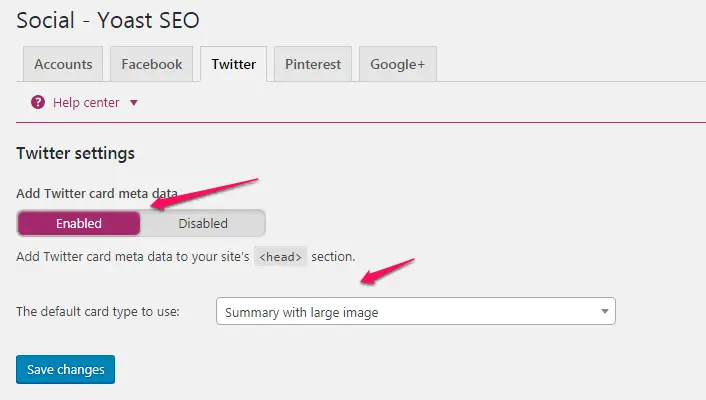
Before using this setting make sure you have added Twitter username in the Account section of SEO Social menu. This section contains two options i.e. share article on twitter with summary or Summary with a large image. Using summary with the large image is more effective than just using summary.
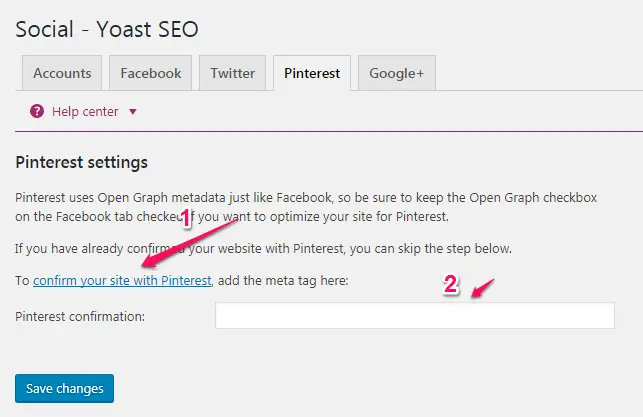
For setting up Pinterest option, first register your site on Pinterest and get meta tag. You can register using link provided in Pinterest section as shown in below screenshot. Once your blog is registered, enter meta tag in below text box and save the setting.
Once you complete this social setting you can upload a custom image for each page/post. Custom image can be uploaded while writing post/page. Scroll down to get social option below post as shown in below image.
XML SITEMAP
A sitemap is one of the most important parts of SEO. It helps the search crawlers to find all the links on one page so that they index your site a bit faster. Once the XML sitemap is ready, you can go ahead and submit it to Google Search Console to get considered by them so that crawling and indexing could be faster.

Newbie often struggles to create a sitemap for their site. But SEO plugin helps to get sitemap in one click. Just enable sitemap for your blog in SEO plugin and click on the link shown in below image to get a sitemap for your site.
User sitemap
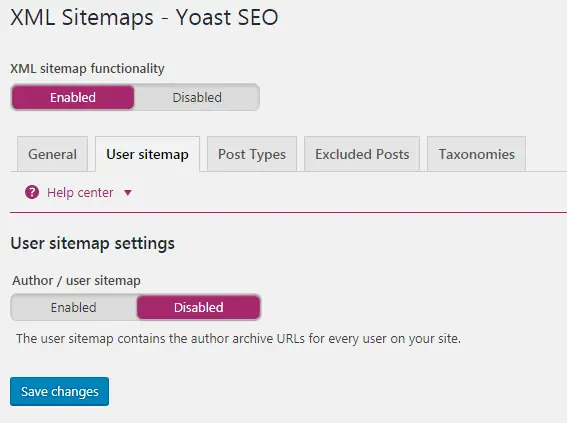
For SEO purpose it is recommended to disable user sitemap. This may create duplicate content while indexing posts or pages in sitemap.
Post Types
In the sitemap, it is good to keep post and pages only so you can exclude media from there.

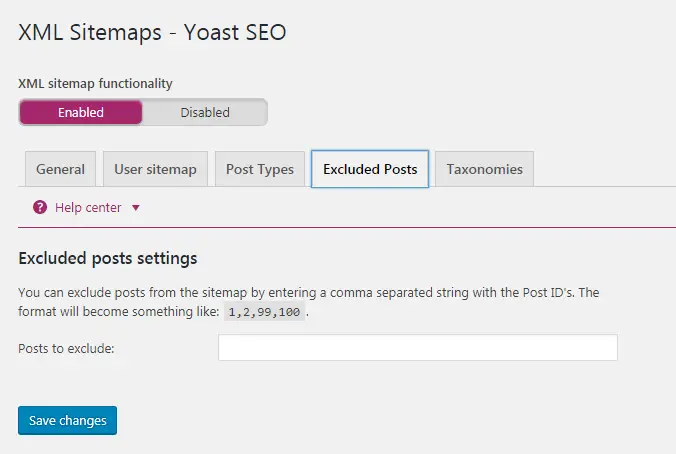
Excluded Posts
You can just enter the post ids to exclude them from the sitemap. This is beneficial when you don’t want to keep a few pages or posts in the sitemap.
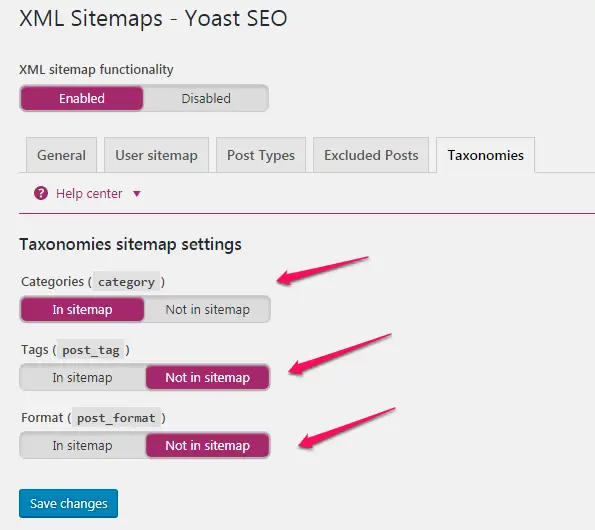
Taxonomies
You can also enable or disable taxonomies from indexing. It is recommended to enable only for categories for effective SEO.
ADVANCED
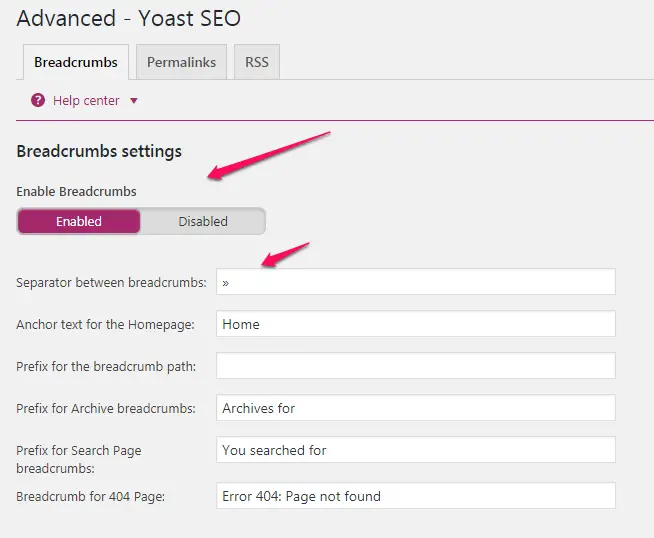
Breadcrumbs
Breadcrumbs help you to know the location of current page /post from the homepage. It looks like Home>>How to>>Post_name. You can define separator in SEO plugin. After you enable this setting you will have to add small code in one of your files. Add below code at end of header.php file using editor option.
<?php
if ( function_exists(‘Yoast_breadcrumb’) ) {
Yoast_breadcrumb(‘
<p id=”breadcrumbs”>’,'</p>
‘);
}
?>
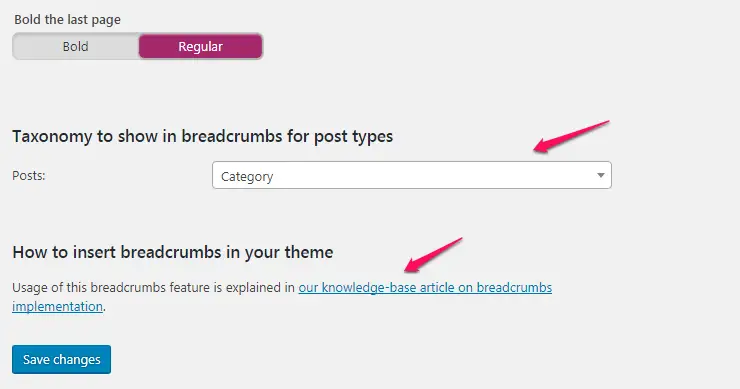
 You can select the type of posts to show in the breadcrumb. Just above Save button there is a link of Yoast tutorial to add code snippet in theme. Same code I have mentioned above. You can use the same.
Permalinks
Permalinks setting in Yoast plugin is different than permalink setting in dashboard setting menu. In SEO there is more advance option available for SEO purpose.
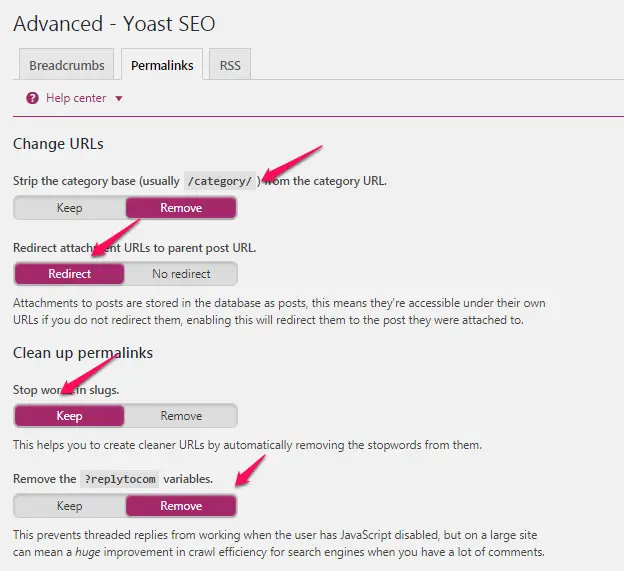
- Strip category base from category URL: Normally in URL you would see /category/, using this option you can remove this part from URL section. Please note if you enable this option then it may clash with a page having the same title. And it may appear as duplicate content. So I recommend disabling this option.
- Redirect attachment URL to parent post URL: When you upload any image, video or file like pdf, docx etc. It will open as a new URL. Enabling this will redirect the reader to the main post. You can enable this option as it is a good feature.
- Stop word in slug: Stop word means ‘is’,’the’, ‘for’, ‘what’ etc. Enabling this option will remove such word from URL. This is also good feature but I would recommend editing URL manually for each post instead of using this feature.
- Remove the ?replytocom variable: URL like wpwars.com/…./#comment-2917 may appear as duplicate content in a search engine. So enabling this option will help in SEO of a blog.
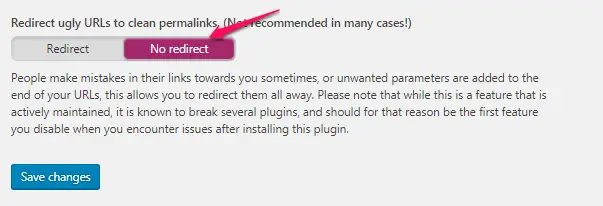
- Redirect ugly URLs to clean permalinks: This feature is not required in many cases. Hence disable this content and same has been suggested by Yoast too.
RSS
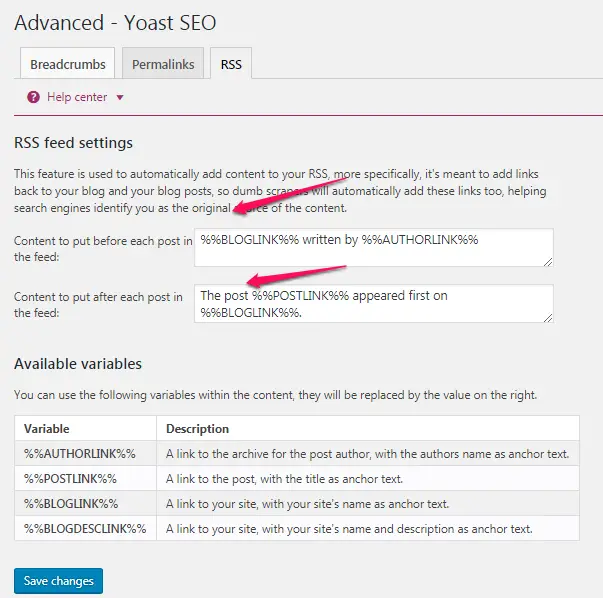
RSS feed of blog shows all the post published on a blog. It helps search engine to know about content posted on a blog. You can manipulate RSS content as per SEO strategy. You can add a link to post, author and blog to your RSS feed so that if someone copies your content then also you will get a backlink from copied content.
TOOLS
Tools provide the option like editing post or pages in bulk, create robots.txt and .htacess file for blog and import/export SEO setting.
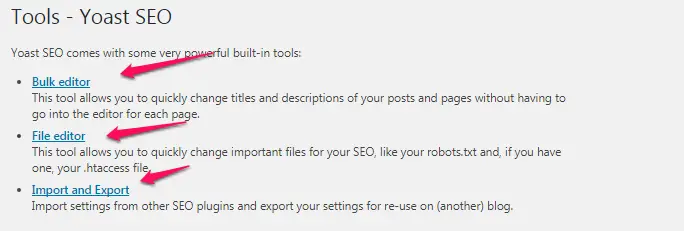
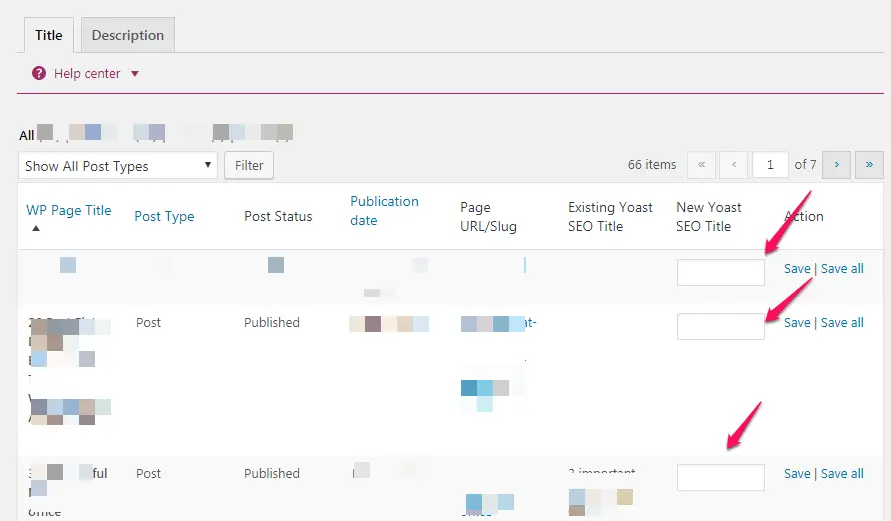
Bulk Editor
You can edit SEO title and description for more than one post at a time.
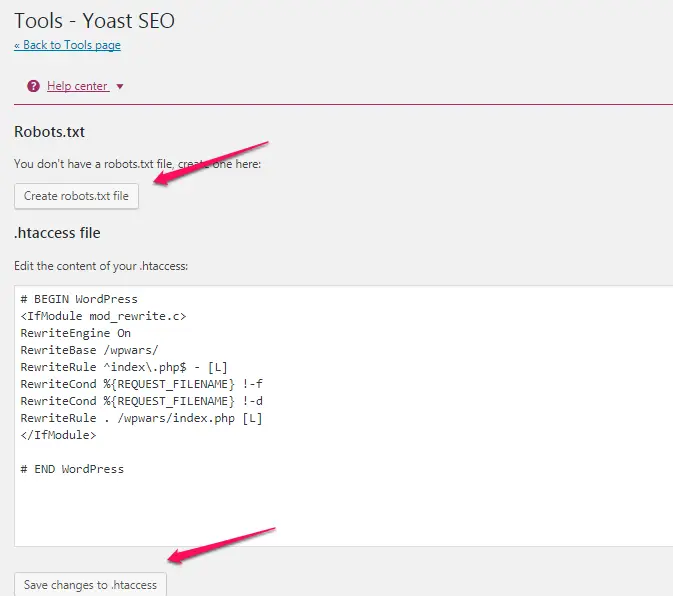
File Editor
Using file editor you can create a robots.txt file which is the most important file for SEO. Also, you can edit .htaccess file of the blog. You don’t have to login to your control panel to access these files.
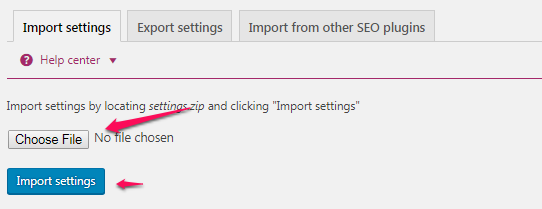
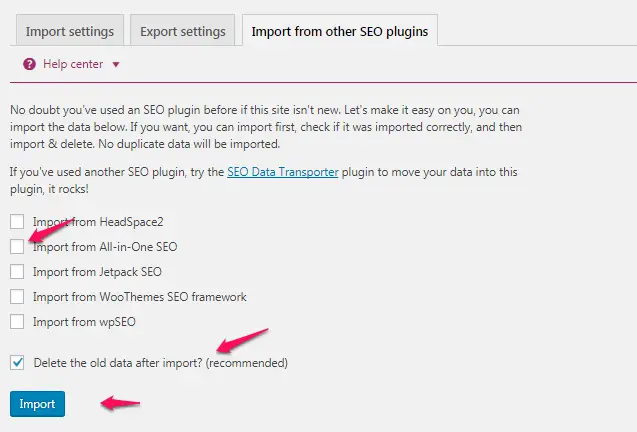
Import Setting
You can import SEO setting using this option. If you are moving from one hosting provider to another then while migration you may lose data. In such situation, you can import SEO setting. You can also import SEO setting recommend by anyone else.
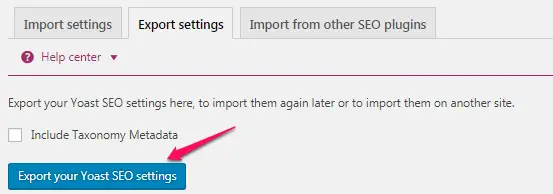
Export setting
Exporting setting will help you to export your SEO setup. This setup will be useful while migrating your blog from one server to another. This is also useful in sharing your SEO setting with anyone else.
Import from other SEO plugins
Importing from other SEO plugins will help when you are planning to move to Yoast plugin from any other SEO plugin.
SEARCH CONSOLE
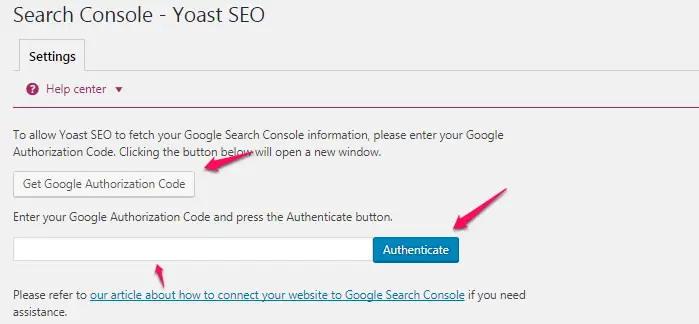
Search Console helps you to connect your blog with Google search engine. You can get Authorization code using the button provided in this section as shown in above screenshot. Once you get authorization code, enter that code in YOAST plugin and click on Authenticate.
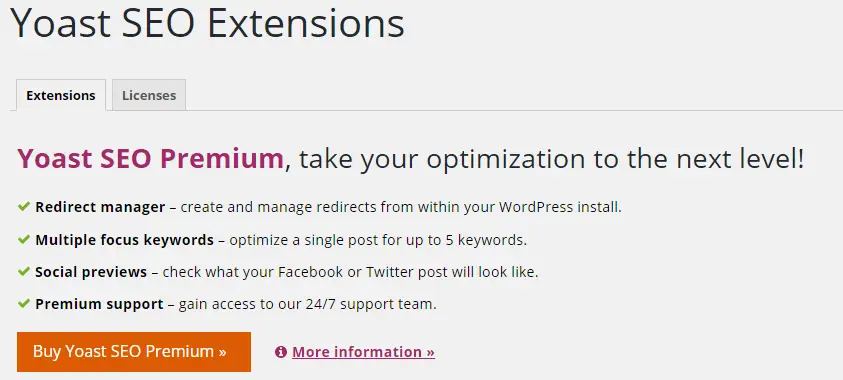
PREMIUM
Yoast plugin comes with lots of features to do SEO for a blog post and page. I hope this will help you to install and setup Yoast plugin on your blog.
Your queries are always welcome through comment box. I am available to answer to your queries.


Ohh my god,
This is really one of the most valuable and detailed article about WordPress SEO Plugin BY Yoast, i have seen ever. You mentioned all the step-by-step tricks which is very helpful for all the bloggers.
thank you so much bro for sharing this precious article with us. i am going to share this article with my friends 🙂
Thanks Amit, for stopping by. We are trying to bring more how to guides on TTW. Thanks for sharing this post with your friends.
Hi Atish,
You’ve written a helpful tutorial for us, thanks!
WordPress SEO By Yoast is an awesome plugin and am using it from long. I always follow the suggestions given by this plugin and it helps me to get good SERP for my blog posts. As you specified, on-page settings is most important and we can do it perfectly with this WP plugin.
Thanks again for presenting this nice tutorial, hope it would help the newbies.
Thanks Nirmala for stopping by. Keep coming and keep sharing your views on the posts of TTW.
Hello Atish,
Nice tutorial here. As we know that SEO by Yoast is the best SEO plugin for WordPress, I am too using that plugin. After reading this post I knew that i have to do much more for my blog. Thanks for sharing. Keep it up.
Thanks For coming by Neeraj. Yes this is one of the coolest plugins for wordpress SEO.
I didn’t know that the WordPress SEO Plugin BY Yoast is such a powerful tool. I really liked the feature about keyword focus. This is jackpot.
Glad that you came to know about this plugin from our blog. keep coming.
Yes very nice article you have written Atish,Really i am also the blogger but i never seen such type step by step instruction of the wordpress SEO by Yoast .
Thanks you for sharing this information with your .
Thanks
Alex
Thanks for praising Alex. Keep coming!
Hi Shiv
Greetings for writing such a wonderful tutorial to fully optimize the Yoast Plugin. Its many initial functions remain in state of disuse at most of the blogs and just its features related to post SEO are generally utilized.
You well covered all the things to do and also justified with your knowledge why to do these things.
I do appreciate your efforts especially at the part of providing technical value to your blog audience and it really solves a big problem of specially those bloggers who are not much techie.
Thanks a lot for sharing this wonderful resource.
Thanks for the comment Mi muba. Yes, How to guides always solve problems of many. Thanks for reading the post.
Great job brother
After reading your article I realized that what I was missing in On page SEO.
Must say it is one detailed and useful article I have ever seen
Thanks a lot 🙂
Thanks for reading the post Rajesh. I am glad that you got to know where you are lacking.
Thanks Atish,
For sharing this plugin and writing its useful features, I always enjoy your blogpost.
karan
Great article Shiv,
I have used SEO by Yoast for quite a time now and this is best tutorial until now. I had some doubts regarding meta keywords and they are now clarified..
Aha, great post Shiv. WordPress SEO by Yoast is definitely my favorite SEO plugin, and frankly the only SEO plugin that I currently use on my WordPress sites. Although it’s very user friendly, it’s also very hard to use for the beginners at the same time. I’m sure this guide will help them out, thanks for sharing anyways 🙂
Thanks for the valuable post. It’s really useful for readers. I was using All in One SEO for long time and I decided to use Yoast plugin. In order to understand it i searched and found your article.
Thanks for sharing your thoughts. I really appreciate your efforts.
Finally i got the full guide to setup seo by yoast on my blog. After following all steps now my blog is seo optimized. Thanks for sharing this wonderful tutorial.
Thanks for the post Atish.I was in search of such post for quite some time.
You have explained in very well, I was looking for this kind of detailed post on Yoast setup.
Thanks for sharing.
I would say this is a pretty effective article for new wordpress users to understand and use Yoast for optimizing their blog. The article above definitely summarizes the entire process and gives a detailed understanding of the different sections which come inbuilt with Yoast plugin. Nice article indeed
This guide gives me a lot of stuff i can do on our WordPress site. It goes from technical tips, to conversion tips, to content tips, to conversation tips, and a whole lot in between. There’s a catch though: if you want to rank for highly competitive terms, you’ll have to actually do most of it and create great and compelling content in the process.Thanks for sharing this post .Love it:)
Thank You Atish for this valuable article. In the Yoast Seo Plugin there are many extra features than All in one Seo. The one of the big feature of this plugin for me is that it give quick SEO analysis of my blog post which helps me to improve my site on page seo very easily.
And by reading your article I have used some other features also about which I was not aware that time and now I am enjoying them.
Nice Explained it. I got the better idea of SEO by Yoast. Now, I’m going to use your techniques in my blogs. Thanks for sharing this very informative guide.
Hey Atish,
Thank you for the wonderfull post,I am planning to move my blogger blog to wordpress & this post will help me to insall This SEO plugin.
Again thanks For sharing the post with us. 🙂
WordPress seo by yoast is a must have plugin for any WordPress website. You have provided an easy and detailed guide to configure it. Thanks.
I have been using SEO by yoast on almost all of my blog to optimize my blogpost. It gives almost everything that our blog needs for SEO, if we have newly installed WP blog, we just have to install SEO by yoast and configure it as recommended SEO configuration and we have done. It also help us for sitemap, meta keywords, meta description and target keywords and much more than that.
Thanks for the detailed information on configuration of SEO by yoast, it would be helpful for more and more bloggers who are new to wordpress plateform.
Thanks for sharing your thoughts about Yoast’s WP plugin Bhavesh. It’s really great.
I would like to know if Yoast has a setting to fix the Canonical url issue. My new WP site is set up without the www and I want the www in the root domain url when the site gets indexed. I looked in the Yoast settings and I cannot figure out how to change the setting.
Hey Darrel,
I think when you go to wordpress setting >> General and there you put your url with www, the issue will be fixed. Do it and let me know if that fix your problem.
Really informative guide. mostly user not configure correctly including me. when i first & second attempt on this plugins.
Nice post Atish Ranjan
The Meta Description box no longer appears on my post dashboard. How do I get it back?
Hello Halil,
It is there only, but that is now prefilled. You just need to click on that to edit and write your own meta description. Let me know if you still don’t find it. Thanks for visiting.
I did as you said, and it’s working now. I think it resulted from the recent update.
God Blessd
great to know that, Halil
I’m also Using SEO by Yoast this is best SEO plugin for WordPress After Read Your This I make some changes in my plugin Settings. i hope these chnges work better for my blog.
Thanks
Really informative guide. mostly user does not configure correctly including me. when I first & second attempt at this plugins.
I am also using YOAST and it is easy to use and it made my work very easy.
Really a very helpful post. Thanks for posting. Keep it up…And I am also using SEO by Yoast Which is best with the SEO WordPress plugin After your blog reading This I made some changes to my plugin settings. I hope these issues work better for my blog.