I welcome you to the third post in the series “Working with Hosts File”, where we are learning to work with the Hosts file in our operating system. You can read my post about editing and hacking Hosts file here => http://ttw.tips/2bsRWpl
In this post, you learn about the custom hosts file and how to work with them in different ways, which includes how to download and install MVPS hosts file and how to edit the same.
What is a custom hosts file?
A custom hosts file is a hosts file, which is customized to provide a layer of security and protection while browsing the Web. It is basically utilized to provide extra security while you surf on Internet. A custom hosts file allows you to block unwanted ads, banners, or any other third party counters from appearing while opening a webpage, which may load these additional unwanted services. You can even block and cease the very connections that supply these little bugs by using the custom hosts file, which is virtually referred to as the MVPS hosts file.
Let us now understand the working of the custom hosts file.
How does it work?
Your computer automatically searches the hosts file for the entry you make in the web browser to open a web page. In the MVPS hosts file, the IP address corresponding to an unwanted ad or other unwanted element is entered as 127.0.0.1 (which is the location of your computer); so when a third party or other unwanted service is requested in the web page you’re working on, the computer starts finding the file onto your computer; after the file is not found, it jumps to the next file and the ads, cookies or banners are failed from getting loaded into the system.
For example, the following entry blocks all the files provided by the DoubleClick server:
127.0.0.1 ad.doubleclick.net
Using a well-created MVPS hosts file, you can fasten the loading of the web pages by avoiding these unwanted ads, banners, or counters. Also, it prevents several tracking websites also known as Data Miners from tracking your Web movement or the webpages that you may visit. In addition, the MVPS hosts files at present contain some really effective entries for blocking big parasites, hijackers, and other Adware programs.
Let us now learn how to install MVPS hosts file.
How To Install MVPS Hosts File?
Different methods are there for installing in different versions of Windows. In our case, we have explained the installation method in Windows 8, however, you may visit the following links to see the instructions for your specific version.
Windows 7 Users: Click this
Windows Vista Users: Click this
Perform the following steps to change Windows Defender settings:
TIPS: You require to change Windows Defender settings before installing the file, because Windows Defender detect the MVPS hosts file as malware and replaces it with the default Microsoft hosts file.
- Open Windows Defender (Figure 1).
- Select the Settings tab, as shown in Figure 1:

[Figure 1]
The options under the Settings tab are displayed (Figure 2).
- Select the Excluded files and locations option from the left pane (Figure 2).
- Click the Browse button in the right pane, as shown in Figure 2:

[Figure 2]
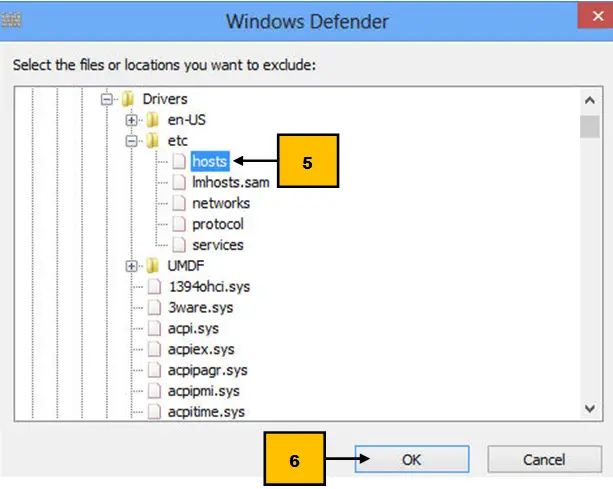
The Windows Defender dialog box opens (Figure 3).
- Browse to the location where the hosts file is saved (Figure 3).
- Click the OK button, as shown in Figure 3:
[Figure 3]
- Click the Add button to add the browsed path (Figure 4).
The selected path is added under the Name section (Figure 4).
- Click the Save Changes button to save the settings (Figure 4).
- Click the Close button to close the Windows Defender window, as shown in Figure 4:
[Figure 4]
Now, perform the following steps to install the MVPS hosts file in your system:
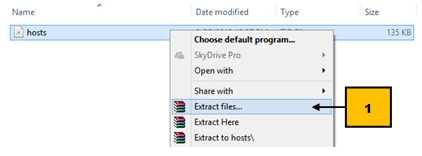
NOTE: Download the hosts file directly from hosts.zip in your User download folder.
- Right-click the downloaded file and extract the files from the menu, as shown in Figure 5:
[Figure 5]
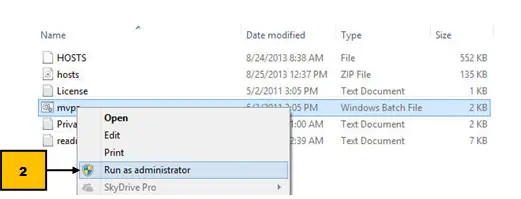
- Right-click the mvps batch file and select Run as administrator, as shown in Figure 6:
[Figure 6]
The User Account Control prompt appears.
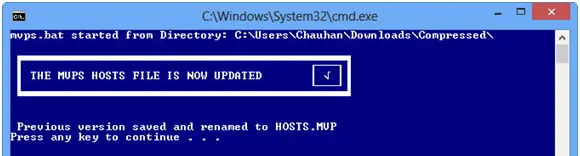
After you click yes, the command prompt appears as shown in Figure 7:
[Figure 7]
NOTE: The message The MVPS Hosts File Is Now Updated appears in the command prompt.
- Press any key to close the command prompt.
The MVPS hosts file is installed and updated successfully in your system.
TIPS: A large hosts file may slow down your system, so you may need to change the DNS client settings from the path Control Panel-> Administrative Tools-> Services.
You can perform the following steps to resolve the problem:
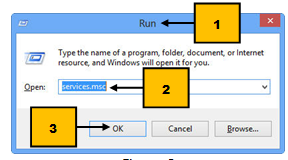
- Open the Run dialog box by pressing the windows key + R combination (Figure 8).
- Type services.msc in the Open: text box to open the Services window (Figure 8).
- Click the OK button, as shown in Figure 8:
[ Figure 8]
The Services windows opens (Figure 9).
- Select the DNS Client option by scrolling down the window (Figure 9).
- Right-click the option and select the Properties option from the menu, as shown in Figure 9:

[Figure 9]
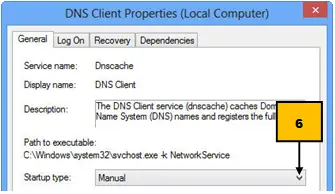
The DNS Client Properties (Local Computer) dialog box appears (Figure 10).
- Click the drop-down arrow of the Startup type list box, as shown in Figure 10:
[ Figure 10]
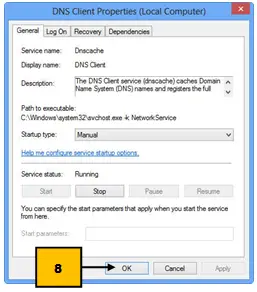
- Select the Manual or Disabled option from the list. In our case, we have selected the Manual option, as shown in Figure 11:

[Figure 11]
NOTE: The Manual option is recommended.
- Click the OK button to save the settings, as shown in Figure 12:
[Figure 12]
Let us now learn how to edit the hosts file.
How to Edit the Hosts File?
Suppose, you want to edit the hosts file as per your requirements, you may do it manually; so you do not need to face permission issues to edit it.
Perform the following steps to edit the hosts file:
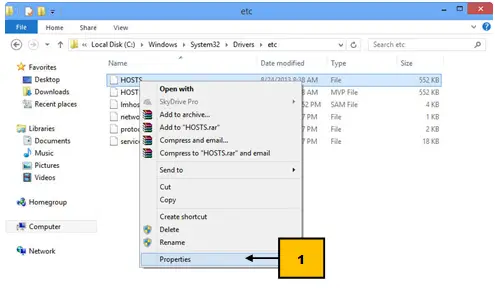
- Right-click the Hosts file and select the Properties option from the menu, as shown in Figure 13:
[Figure 13]
The etc Properties dialog box appears (Figure 14).
- Select the Security tab in the etc Properties dialog box ,as shown in Figure 14:
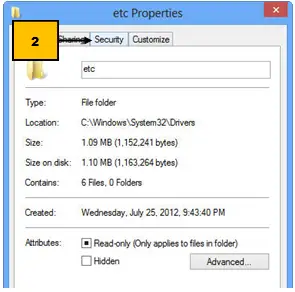
[Figure 14]
The options under the security tab are displayed (Figure 15).
- Select your account under the Groups or user names section (Figure 15).
- Click the Edit button, as shown in Figure 10:
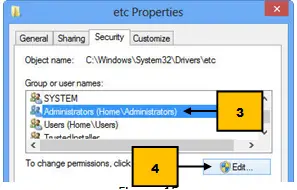
[Figure 15]
The Permissions for etc dialog box appears.
- Select the checkboxes, as per your requirements.
- Click the OK button to close the Permissions for etc dialog box.
- Click the OK button in the etc Properties dialog box to save the settings.
So this ends our third and the last post in series “Working with Hosts File”. We hope that you guys liked the previous posts and like this one too. We tried to cover almost everything important meant to be taught and learned while working with hosts file. However, you can share your queries if any, with us and we’ll try to resolve them as much as we can.


Hello Zainil
Nice article with a great explanation. All information is very helpful and images make it very easy to understand. Thanks to share such a informative post
Thanks a zillion Shwetta for your kind words ! ! 🙂 🙂
Hi Zainil,
I have gone through this problem of getting useless ads when I open my Chrome browser. I don’t know from where these ad come? With every window I open something useless add shows up making me restless and irritated. Thanks for the detailed knowledge about host files. Will check the process and will make changes for sure.
Hi Aditiya! 🙂
These ads are basically added by the webmasters to the developers to earn money ! ! Those ads are indeed very annoying ! ! 🙁
Yes Zainil, they really are very annoying. I have to uninstall the browser before this post and all my important bookmarks are lost. But now I know what to do if this problem occurs again.
Hi Zainil,
Great article. Even i get irritated when i see all the ads around the screen all the time. Its really annoying.
Thanks for explaining the process. Images makes it much easier to understand.
Thanks a lot Ankit for stopping by and appreciating the post ! 🙂 🙂
Hello Zanil,
I don’t have enough knowledge on hosting. I am collecting information from internet. Your article is really awesome. I have got a clear idea about how to work with custom host file. Thanks bro for sharing this article.
Hello Moumita! 🙂
I am glad that you liked the post; please read the 1st & the 2nd part of the hosts file series, which are mentioned in the introduction of the post! 🙂
Really, neat and clean tutorial, as I am tech guy I won’t found it difficult to understand. But I am 100% sure that even a non tech guys will get it clearly in one shot.
Thanks for sharing this Zainil. Have nice day bro! 🙂
>SK Lohar
Thank you, Zanil!
The article is really great. I’ve changed the hosts file often, because of work needs, but have never heard of such wonderful possibilities before. Will certainly try it out!
Nice and very informative article
The way the article has summed all points is really amazing. It is very easy to understand when compared to the other articles i have read from other websites. The images in between helped to grasp much more easily. I always found it difficult to work with this but now i could easily work with custom host file and manage it. Really appreaciable work
Thank you for sharing.
Hi Zainil,
Great Man. A clear cut explanation. Most of the members thinking that, working with custom host file s very hard and irritating. But this post will surely help them to destroy the annoying ads. Thanks for sharing this man. Nice to see you here.